The RAID-Z Manager from AKiTiO provides a graphical user interface (GUI) for the OpenZFS software, making it easier to create and manage a RAID set based on the ZFS file system. The functions, features, security, reliability and compatibility depends completely on OpenZFS and the application only works if the ZFS file system has been installed on that particular system. For more information about OpenZFS, please refer to http://www.open-zfs.org.
Supported Operating Systems:
Mac OS X 10.10, Mac OS X 10.11, macOS 10.13
Supported Products:
AKiTiO Thunder2 Quad, AKiTiO Thunder2 Quad Mini, AKiTiO Thunder3 Quad Mini, Thunder3 Quad X
This app has been discontinued and is no longer available for download.
Software Installation
Installing the software
- Go to https://openzfsonosx.org/ and download the corresponding version of OpenZFS for your macOS.
macOS 10.13 > OpenZFS 1.7.0
Mac OS 10.12 > OpenZFS 1.6.1
Mac OS 10.11 > OpenZFS 1.5.2
Mac OS 10.10 > OpenZFS 1.4.5 - Install the corresponding version of OpenZFS for your system. When updating your OS, keep OpenZFS updated as well or otherwise, the RAID might stop working.
- Download the RAID-Z Manager from this website and store the file on your computer.
- Double-click on the *.dmg file.
- Drag the RAID-Z Manager to your Applications folder and drop it.
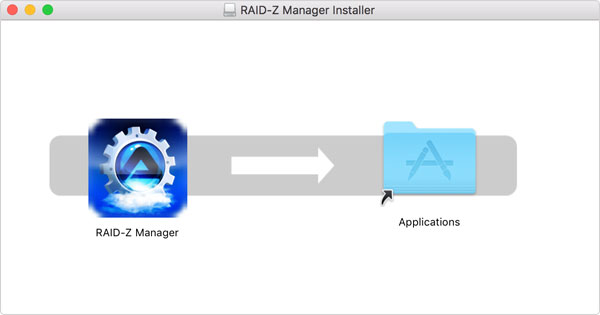
- Close any open finder windows and eject the remaining disk image by dragging it to the trash.
- Delete the *.dmg file. When needed, you can always download the latest version again from this website.
Uninstalling the software
- Close the application and go to the Applications folder.
- Drag the RAID-Z Manager application to the trash.
- You can keep using OpenZFS and manage your pools through the command line but if you would like to remove OpenZFS as well, follow the instructions at https://openzfsonosx.org/wiki/Uninstall.
How to use
Creating a RAID-Z set
- Connect your AKiTiO storage device to the computer and turn it on. Make sure your device is one of the supported models as seen above.
- If necessary, backup your existing data in a different location, because the drives will be formatted in the next few steps.
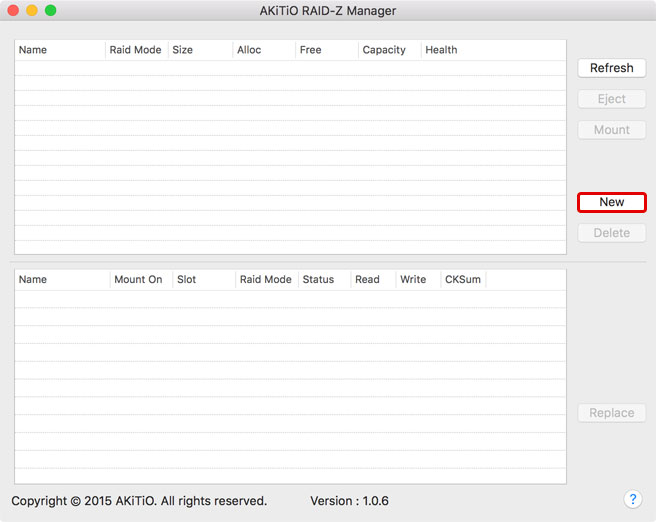
- Start the RAID-Z Manager and click New to create a new RAID set.
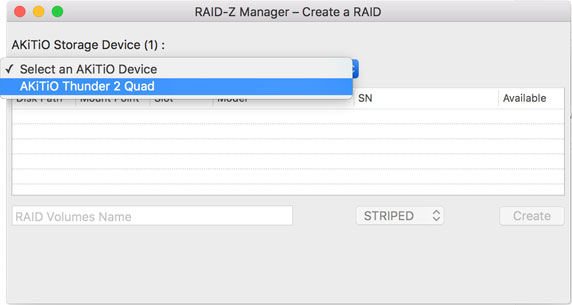
- Select your AKiTiO device from the list of available devices.
- After selecting your device, the RAID-Z manager lists the available disks.
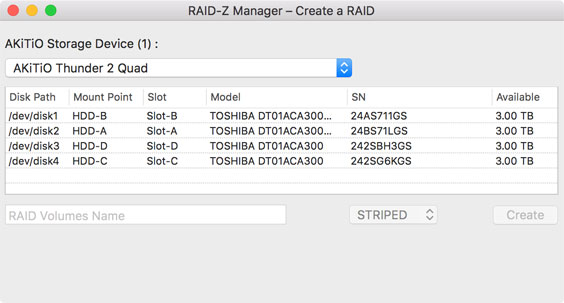
- To create a RAID set, follow the steps below. For advanced users, you can also enable the option zpool and modify the command according to your own preferences.
[1] Select the disks that you would like to add to the RAID set. A minimum of 2 disks is required for a striped RAID set and a minimum of 3 disks for RAID-Z (RAID 5).
[2] Name your new RAID set. This is the name that will show up on your desktop.
[3] Select your preferred RAID mode. The options are STRIPED (RAID 0), RAID-Z (1-disk parity, similar to RAID 5) and RAID-Z2 (2-disk parity, similar to RAID 6).
[4] Click Create to create the RAID set.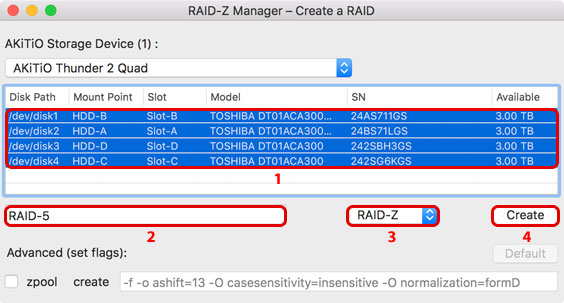
- In order to execute the sudo command, the application prompts you to enter the password of the current user (root is not required). The default password prompt timeout on the Mac is 5 minutes, so you might have to enter the password again occasionally.
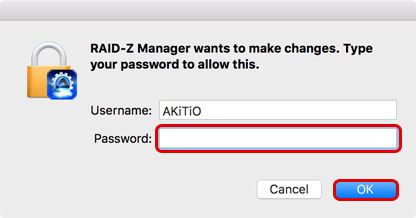
- Creating a new RAID set will take a few seconds. Please wait and let the application complete the process.
- If some of the drives have been mounted on the desktop, you will get a prompt from the system warning you that the disk you inserted was not readable. This is to be expected and can be safely ignored. Do NOT initialize or eject the disk!
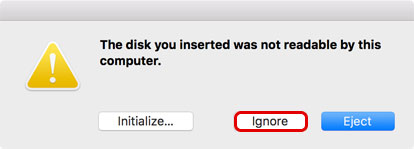
- The new RAID set is now ready and you can select it in order to see more details about the disks.
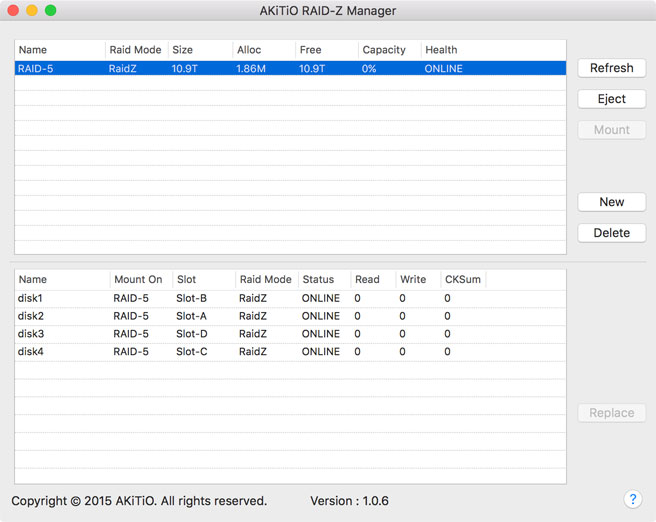
When creating a RAID set using the ZFS file system, hot plug is not supported! When disconnecting the drive, it is important to first unmount and then export the RAID system by using the Eject button in the RAID-Z Manager. Otherwise, the system might crash and corrupt your data.
- The RAID set has also been mounted on the desktop under the name you have created earlier.

- To see the current status of your RAID set and to check if there are any errors, click Refresh. This has to be done manually and if more than 5 minutes have passed since the last login, you will be prompted for the password again.
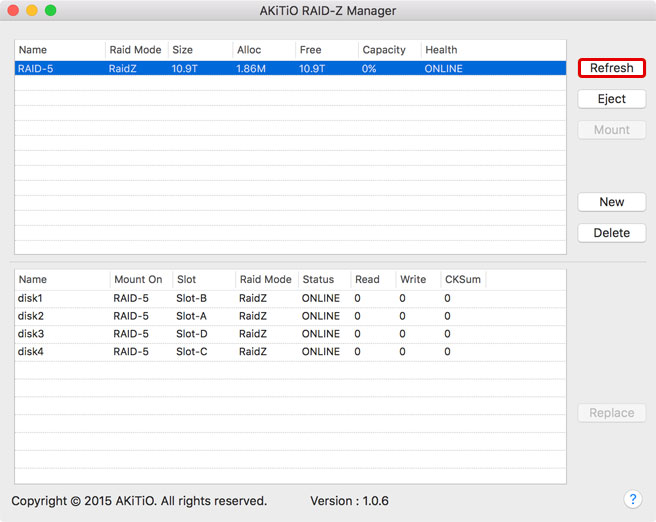
- Click Eject to eject the RAID set when you plan on disconnecting or turning off the external drive. Simply pulling the drive icon to the trash is not enough to eject the RAID set.
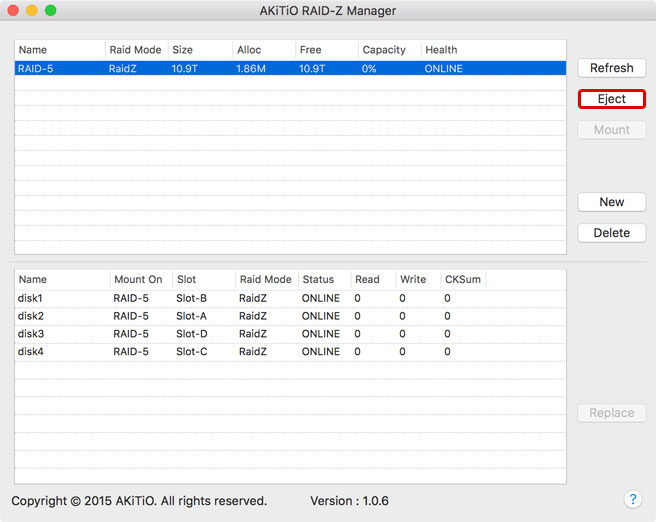
- To mount it again, click Refresh to see the latest status, select the RAID set and then click Mount.
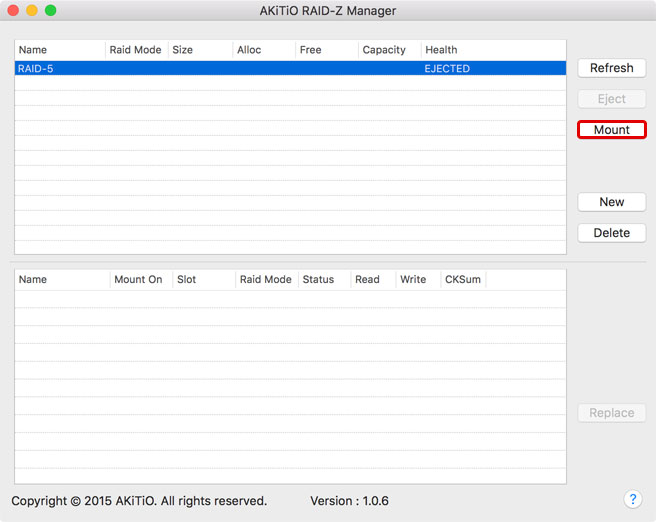
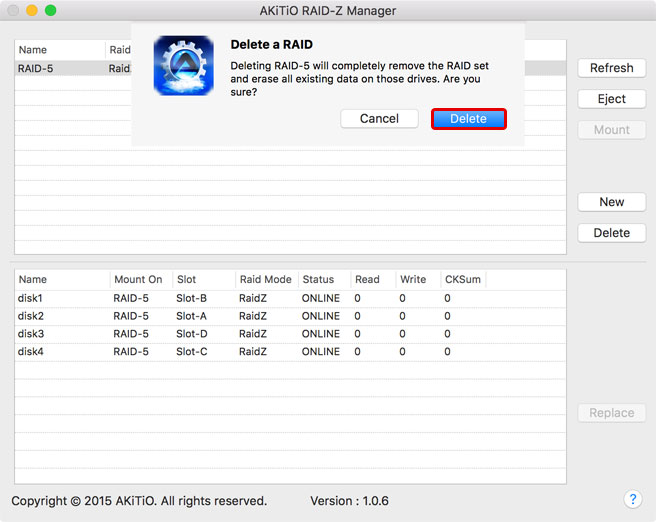
- To completely delete the RAID set, select it and click Delete. Make sure to backup your data in another location first, because deleting the RAID set will also erase all your existing data on those drives.
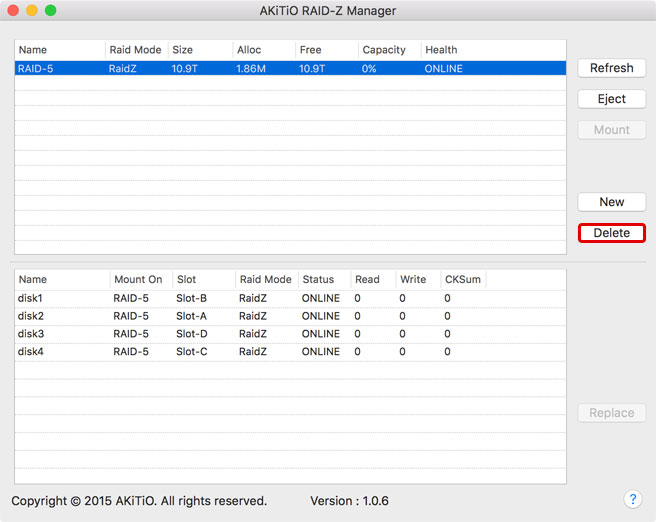
- When prompted, press Delete to confirm the removal of the RAID set.
Replacing a faulty disk
How to detect and replace a faulty disk in a RAID-Z set
- To see the current status of your RAID set and to check if there are any errors, click Refresh. There is no other warning or notification, so you will have to refresh the status manually in order to see any potential errros.

- In order to execute the sudo command, the application prompts you to enter the password of the current user.

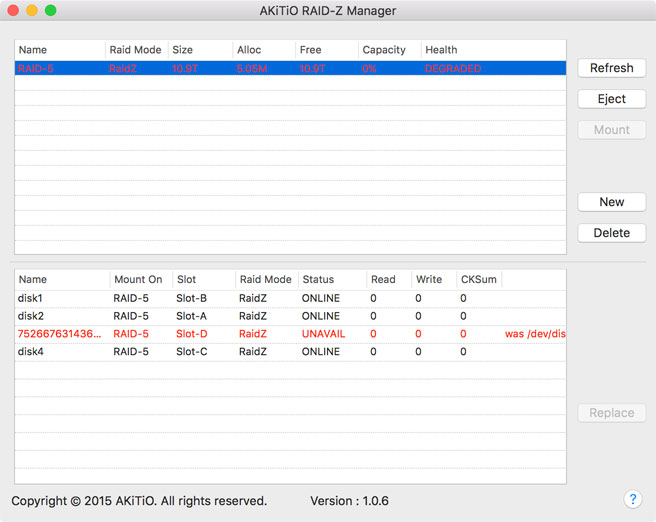
- When there is a problem, the RAID set is marked in red. Select it to see more details about the disks in the second window. In this example, the disk in Slot-D has a problem. Because it's a RAID 5 set, the data can still be accessed but it's recommended to replace the drive as soon as possible.
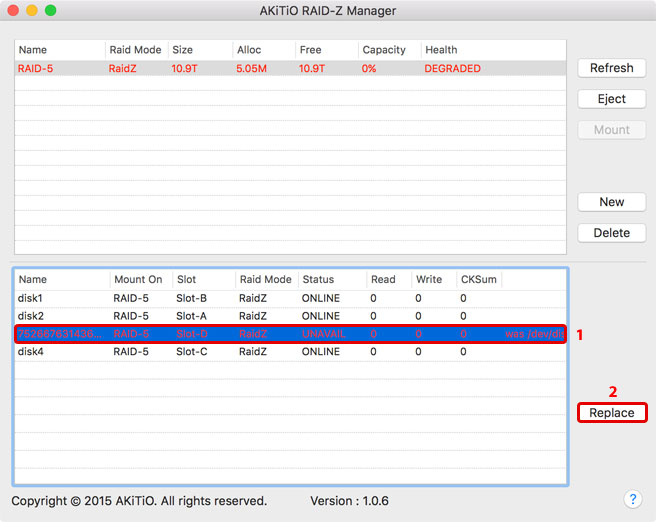
- Select the faulty disk and click Replace.
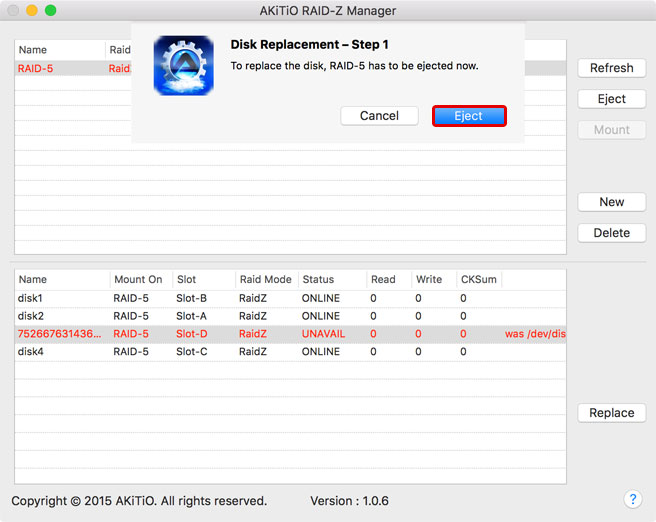
- When prompted, click Eject to eject the RAID set.
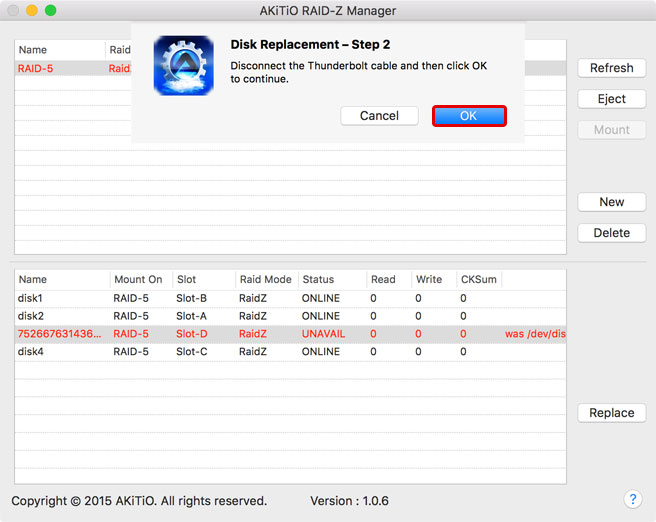
- Disconnect the Thunderbolt cable and then click OK.
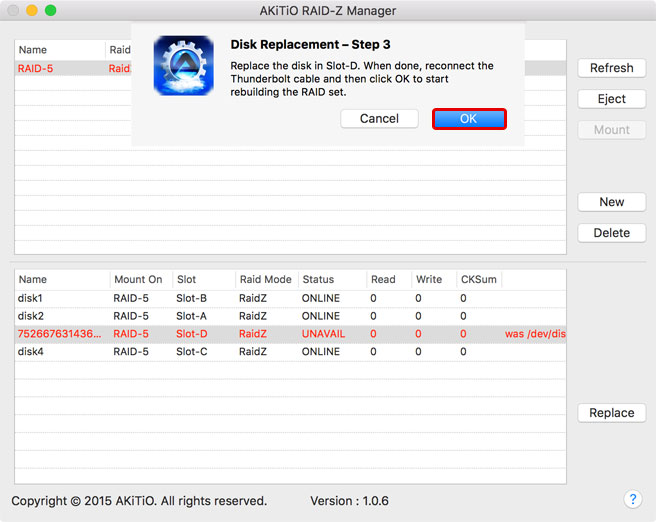
- Replace the faulty disk. When done, reconnect the Thunderbolt cable and then press OK to start rebuilding the RAID set.
- Rebuilding the RAID takes a while. Please wait and let the process complete. You can refresh the screen occasionally to see if it has completed the rebuild.
Software Disclaimer
About RAID-Z Manager
This application from AKiTiO provides a graphical user interface (GUI) for the OpenZFS software, making it easier to create and manage a RAID set based on the ZFS file system. The functions, features, security, reliability and compatibility depends completely on OpenZFS and the application only works if the ZFS file system has been installed already. For more information about OpenZFS, please refer to http://www.open-zfs.org.
Preventing Data Loss
A RAID system alone does not guarantee that your data is safe and it is not a substitute for backups. You should always keep a second and independent copy of all your data in a different location. This can mean keeping the original data on your computer or better yet, making a second backup on a different storage media.
Software Disclaimer
This free software is provided ‘as is’ with no explicit or implied warranties in respect of its properties, including, but not limited to, correctness and/or fitness for purpose. While care has been taken to ensure that under normal operations things don't go wrong, there's no guarantee of that fact. The use of the software is done at your own discretion and risk and with agreement that you will be solely responsible for any damage to your computer system or loss of data that results from such activities.
GUI & Documentation
The software and its documentation could include technical or other mistakes, inaccuracies or typographical errors and could be out of date. AKiTiO may make changes to the software or documentation without prior notice but makes no commitment to update such materials. AKiTiO assumes no responsibility for errors or omissions in the software or documentation available from its website.
Limitation of Liability
IN NO EVENT UNLESS REQUIRED BY APPLICABLE LAW WILL AKITIO BE LIABLE TO YOU FOR DAMAGES, INCLUDING ANY GENERAL, SPECIAL, INCIDENTAL OR CONSEQUENTIAL DAMAGES ARISING OUT OF THE USE OR INABILITY TO USE THE PROGRAM (INCLUDING BUT NOT LIMITED TO LOSS OF DATA OR DATA BEING RENDERED INACCURATE OR LOSSES SUSTAINED BY YOU OR THIRD PARTIES OR A FAILURE OF THE PROGRAM TO OPERATE WITH ANY OTHER PROGRAMS), EVEN IF AKITITO HAS BEEN ADVISED OF THE POSSIBILITY OF SUCH DAMAGES.
FAQ
Frequently asked questions
Can I use this application with any drive?
No, the RAID-Z Manager only supports the AKiTiO Thunder2 Quad, AKiTiO Thunder2 Quad Mini, AKiTiO Thunder3 Quad Mini and Thunder3 Quad X.
Can I create a RAID set across multiple devices?
No, you can only create a RAID set from the drives in one storage enclosure.
Can I create multiple RAID sets?
Yes, you can create multiple RAID sets but you can only manage one device at the time and you cannot create a RAID set across multiple devices.
Why does it keep prompting me for the username and password?
The application uses the sudo command, which requires the occasional input of the current user's password (root is not required). This applies to all functions, including a simple refresh. Because the default password prompt timeout on the Mac is 5 minutes, you might have to enter the password multiple times.
Can I eject the drive by simply dragging the drive icon to the trash like with other drives?
No, please use the RAID-Z Manager, select your RAID set and then click the Eject button to eject the drive before you disconnect or turn it off.
Can I also manage my RAID set without the RAID-Z manager?
Yes, the RAID-Z Manager is simply a graphical user interface for the standard OpenZFS commands, so you can also manage your drives using the Terminal.
What can I do if the RAID-Z manager doesn't recognize or cannot manage my existing RAID set?
Make sure your RAID is connected to the computer and turned on. Open the Terminal and enter the command sudo zpool import. This command will list the existing storage pools, where you can grab the name of your RAID set (pool). Next, enter the command sudo zpool import [pool-name] but replace [pool-name] with the corresponding name you got from the previous step. If that doesn't work, please use the id instead like this sudo zpool import -f [id-number]. At this point, you should be able to use the RAID-Z manager again.
Why did my RAID suddenly stop working?
If you have recently updated your OS, please make sure to update OpenZFS as well. Restart your computer and the RAID should be recognized again.

