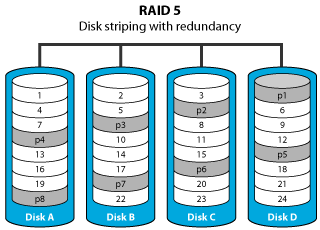
 A redundant array of independent disks (RAID) can be used to improve the I/O performance and therefore offer faster transfer rates, mirror the data for redundancy in case of a disk failure or combine the storage capacity of multiple disks to create one large volume. Depending on the RAID controller and the amount of drives, different RAID modes can be used.
AKiTiO's data storage products make use of both hardware and software RAID, depending the model. A hardware RAID is created by a built-in RAID controller and is independent of the computer and the operating system. A software RAID is created either by the operating system of the computer or by the software that is running on the product itself (e.g. MyCloud series).
In both cases, it's important to consult the user documentation before setting up the RAID, as each product and RAID controller works slightly different.
Important
Important information about AKiTiO's hardware and software RAID
Software vs hardware RAID
Hardware RAID - The RAID is created and managed by the RAID controller inside the data storage product. The RAID is independent of the computer and the operating system. This means that you can move the drive from one computer to the other and assuming that the file system (e.g. NTFS or HFS+) is recognized by the operating system, you will always be able to access your data.
Software RAID - There are two types of software RAID. For network drives like the MyCloud series, the RAID is created by the embedded Linux system. For direct attached storage drives without RAID controller like the AKiTiO Thunder2 Quad and the AKiTiO Thunder2 Quad Mini, the RAID can be created by the operating system on the computer (e.g. Mac OS X or Windows 8). The RAID is dependent on the operating system and the data cannot be accessed from another system.
Preventing data loss
Just because a product supports RAID doesn't mean the data is automatically safe. Even when using a RAID mode with redundancy (e.g. RAID 1 or RAID 5), it’s always best to keep a second copy of your data in a different location. This could mean that you keep the original data on your computer or make a second backup somewhere else. Doing so makes it possible to easily and quickly recover your data even if you accidentally delete files, the data on that drive gets corrupted, the RAID controller fails or something else happens to your hardware and hard drives (e.g. natural disaster or computer virus).
Preparing enough storage space may be expensive up front when you need to buy additional drives but if your data is valuable, it is well worth the investment. If you currently don't have another backup location and there is not enough space to keep the original data on your computer, consider buying a second RAID enclosure and another set of drives at the same time. Buying the same RAID enclosure for the second backup unit has the additional benefit that it can act as a backup for the hardware too (e.g. same RAID controller, same power supply).
Protecting existing data during setup
If you have some existing data on the drives that you intend to use in a new RAID, make sure to backup the data in a different location first. When you setup a new RAID or change the RAID mode, all existing data is lost! The exception to the rule is Non-RAID but even then, it's better to have a backup than lose data in case something goes wrong during the setup.
Recovering and accessing data on a RAID array
For hardware RAID, the data can only be accessed when the drives are installed in the original product where the RAID was originally created. It's not possible to move the drives to another product without re-formatting the drives. The exception to this rule is when both products are based on the same RAID controller and the same firmware version. However, even then, it's important to make sure that the settings are identical and it's best to create a backup of all the data in a different location first, before moving the drives.
For software RAID, the data can be accessed on other computers that are running the same operating system (e.g. MacBook Pro and MacBook Air both with OS X 10.9) but it's not possible to access the data from a completely different system (e.g. Windows and Mac OS). For network drives like the MyCloud series, the disks should be installed inside a product that is based on the same firmware and the drives will have to be mounted manually.
Expanding the storage capacity for an existing RAID
Whenever you change something on an existing RAID, be that installing larger drives or adding additional drives, it's necessary to create a new RAID system.
- Backup all the data from the old drives in a different location.
- Replace or add the new drive(s).
- Set your preferred RAID mode and format the drives.
- Move all the data from the backup location back to the newly created RAID.
RAID modes
Depending on the RAID controller and the amount of drives, you can select between different RAID modes to setup the disks according to your own requirements.
- RAID 0 - Disk striping is used where speed is the primary objective.
- RAID 1 - Disk mirroring is used for redundancy in case of single disk failure.
- RAID 5 - Disk striping with parity is a good compromise for performance, redundancy and storage capacity.
- RAID 10 - Disk mirroring with striping is used for redundancy in case of a single disk failure.
Some additional terms that are used for AKiTiO's products include Non-RAID, JBOD, SPAN and BIG. The exact definition of these terms depends on each model but following is a general description.
- Non-RAID - No RAID is created and the disks can be accessed seperately. They are presented to the system as independent logical volumes. This mode is sometimes also known as JBOD.
- BIG/SPAN - In most cases these terms mean that the disks are combined into one single volume for maximum storage capacity. In some AKiTiO products, this mode might also be labelled as JBOD.
Microsoft Windows
How to create a software RAID on Windows 8
The instructions below show how to create a software RAID with two disks on Windows 8. Not all versions of Windows support this function.
This RAID cannot be accessed on other systems like Mac OS X. For PC users, you can move the RAID to another computer but we recommend using the same version of Windows.
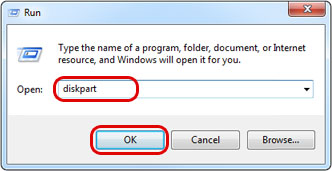
- Go to Start, select Run, type diskpart and click OK.
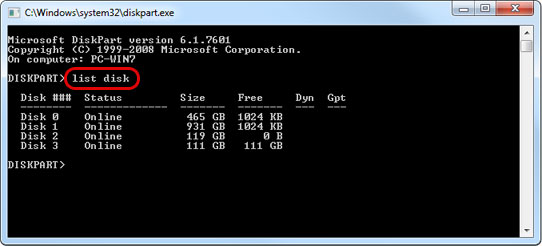
- Type list disk to see all the available disks. For more information about the disk part program, see http://support.microsoft.com/kb/300415.
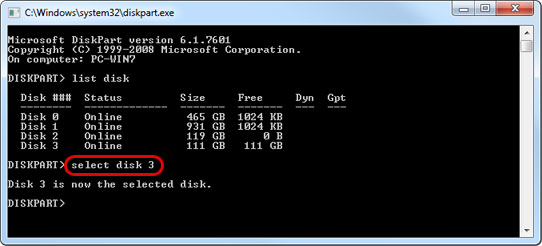
- Select the external disk. As an example, to select Disk 3, type select disk 3.
- Type clean to clear the existing partition(s). MAKE SURE THE CORRECT DISK HAS BEEN SELECTED BEFORE YOU EXECUTE THE COMMAND!
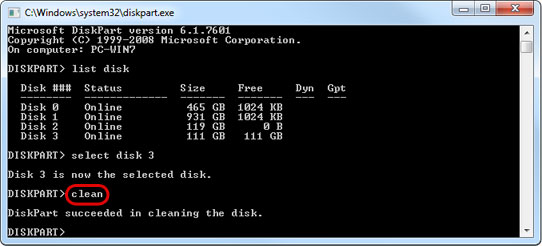
- Repeat the previous two steps for all the disks that you plan on using in the new RAID system.
- Open the Disk Management console.
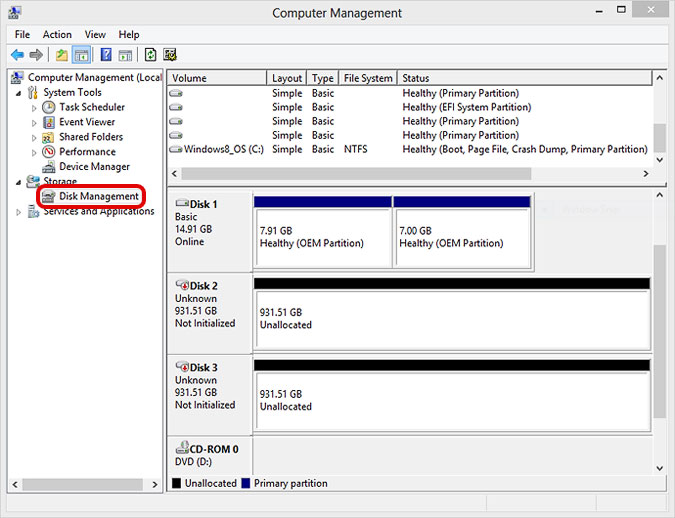
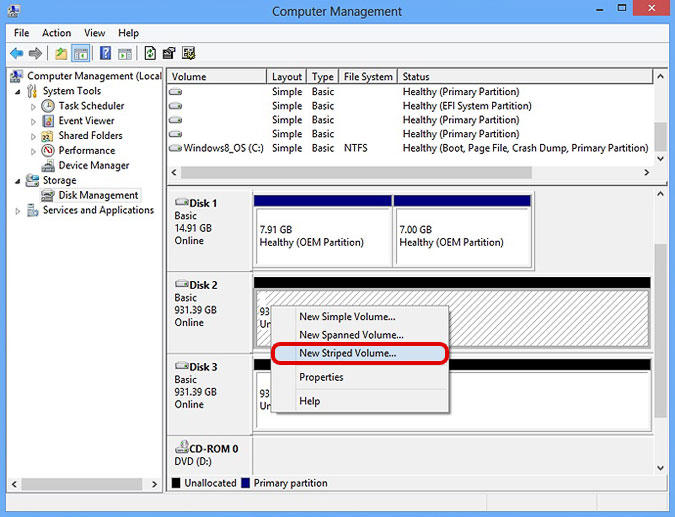
- Right-click a segment of free-space on the disk that you would like to include in the new RAID and select your preferred RAID mode (e.g. Striped Volume, Spanned Volume, Mirrored Volume). In this example, we will create a Striped Volume.
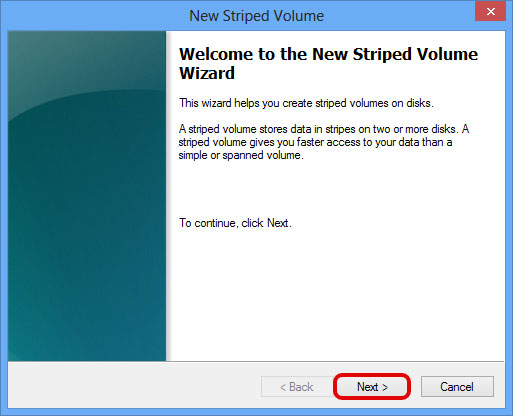
- The New Striped Volume Wizard appears. Click Next to continue.
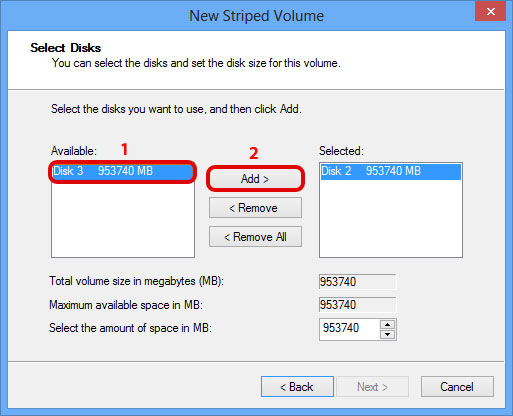
- Select from the available disks (1) and then click Add (2) to add the disks to the striped volume.
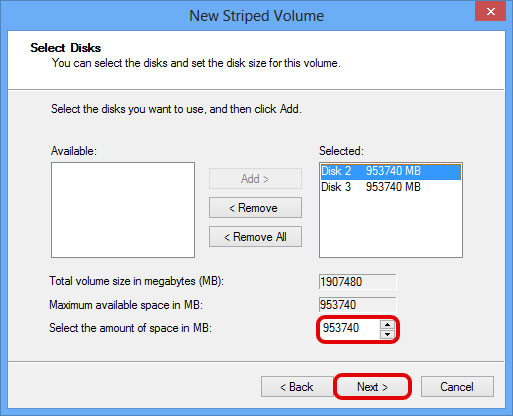
- Set the amount of space to use on the disks for the striped volume and then click Next.
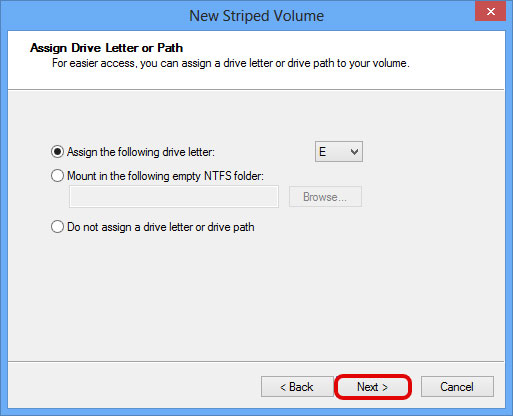
- The default is to assign the next available drive letter to the new volume. You can also mount the volume on an empty NTFS folder on an existing volume. Click Next to continue.
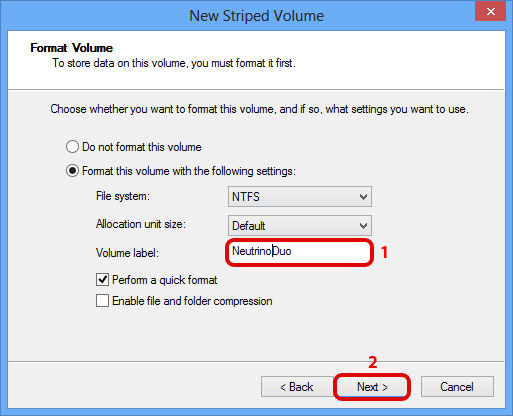
- Enter a name for the new volume (1) and click Next (2) to continue.
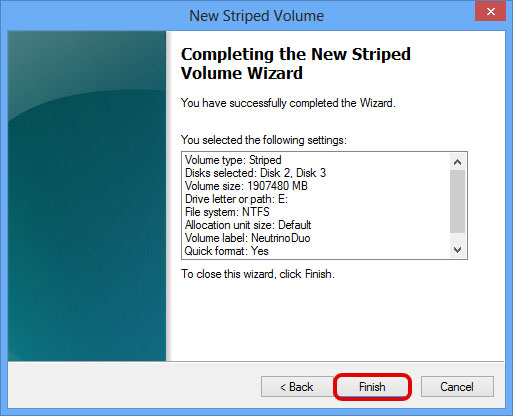
- Click Finish on the summary page to create the volume. If the disks are basic disks, you'll be warned that this operation will convert them to dynamic disks. Click Yes to convert the disks and create the striped volume.
Mac OS 10.7-10.10
How to create a software RAID on Mac OS X 10.7 - 10.10
Following instructions show how to create a RAID set with 2 disks. Scroll further down to see how to create a RAID 10 with 4 disks.
This RAID cannot be accessed on other systems like Windows. For Mac users, you can move the RAID to another computer but we recommend using the same version of Mac OS X. If you use Mac OS X 10.11 (El Capitan), you can still access your RAID set but you can no longer manage it through the disk utility.
- Start the Disk Utility. You can find this program under Applications > Utilities > Disk Utility.

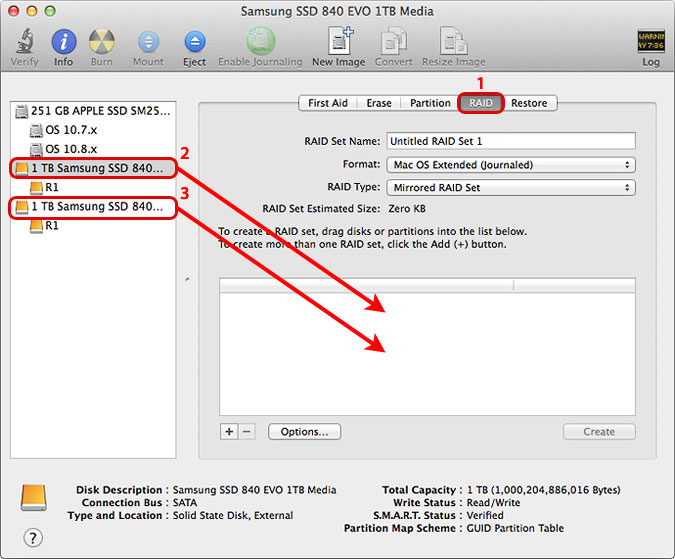
- Select the RAID tab (1) and drag the drives (2/3) that you would like to add to the RAID onto the blank field in the RAID section.
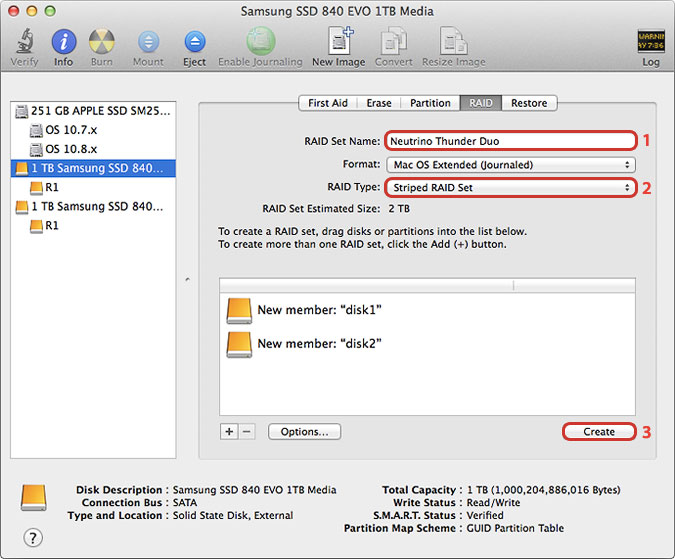
- Enter a name for your new RAID (1), select your preferred RAID type (2) from the list of available RAID modes (e.g. Striped RAID Set, Mirrored RAID Set, Concatenated Disk Set) and click Create (3) to create the RAID. In this example, we will create a Striped RAID Set.
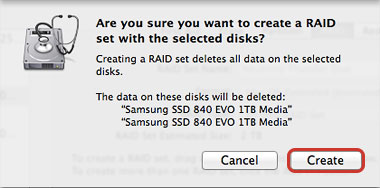
- Click Create to confirm.
- Select your new RAID (1) to see it's status and further details (2). Done!
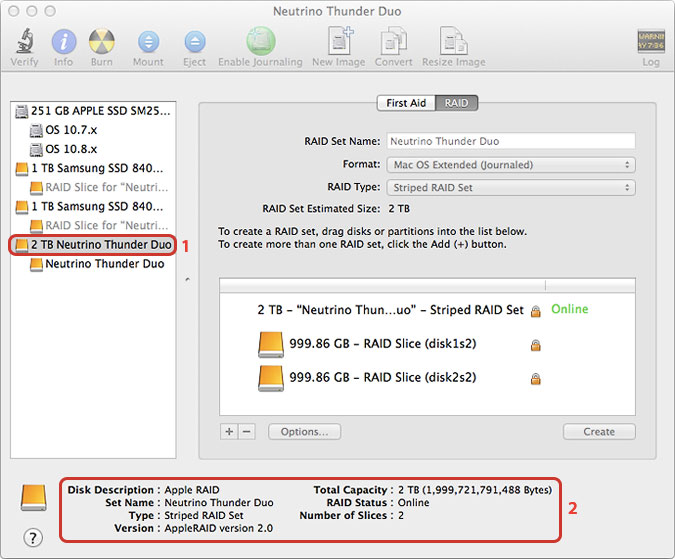
How to create a RAID 10 system on Mac OS 10.7 - 10.10
The instructions below show how to create a RAID 10 system with a striped set of mirrors on Mac OS X. RAID 10 is useful for a storage enclosure with four drives, providing redundancy in case of a single disk failure yet still delivering fast transfer rates.
- Start the Disk Utility. You can find this program under Applications > Utilities > Disk Utility.

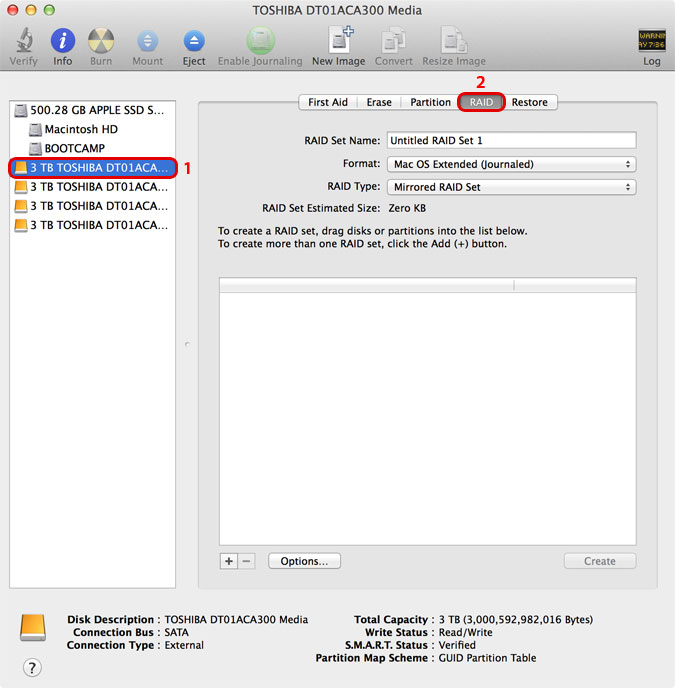
- Select any of the drives to be included in the new RAID system (1) and then select the RAID tab (2).
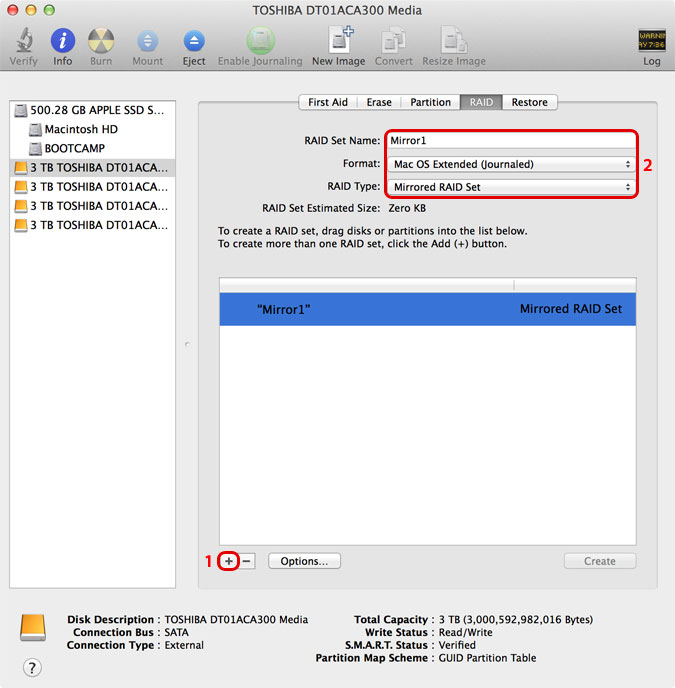
- Click the plus button (1), name the RAID set and set the RAID type to Mirrored RAID Set.
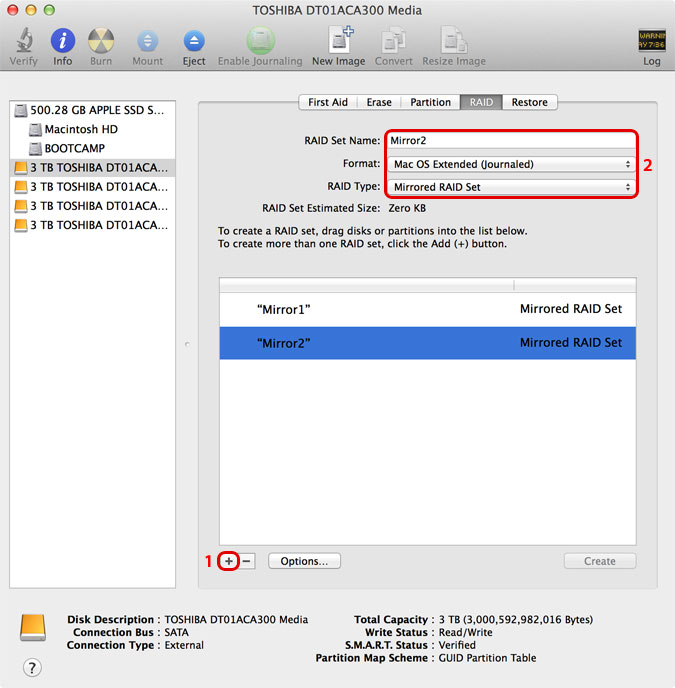
- Repeat the previous step for the second set of mirrors.
- Click the plus button a third time (1) and name the RAID set but this time set the RAID type to Striped RAID Set (2).
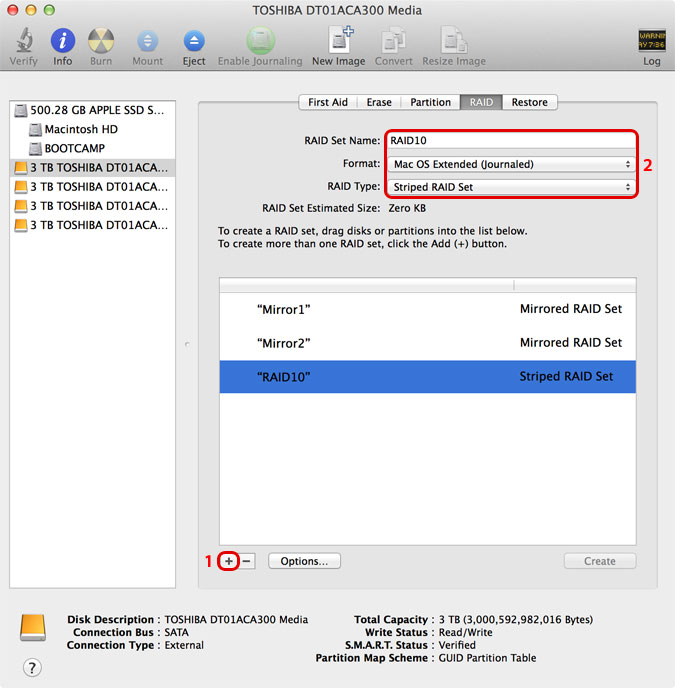
- Select two of the drives to be added and drag them onto the first mirror set.
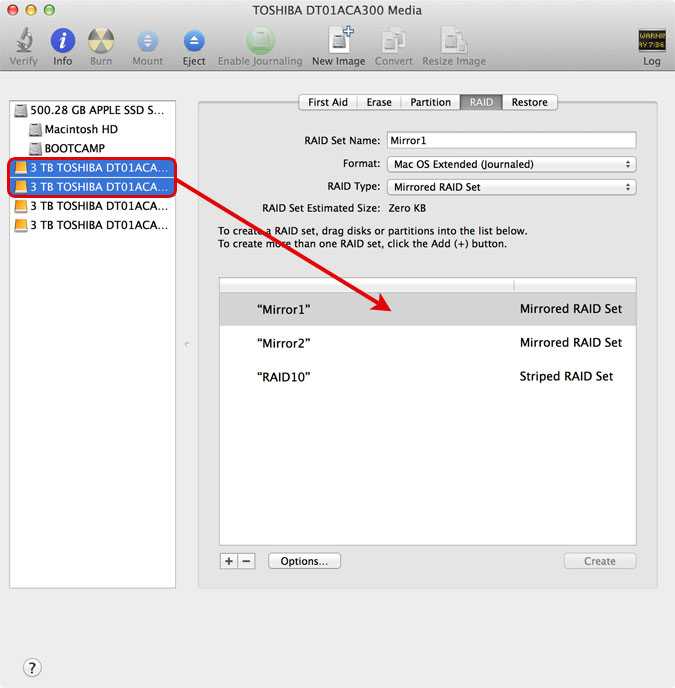
- Repeat the previous step with the remaining two drives and drag them onto the second mirror set.
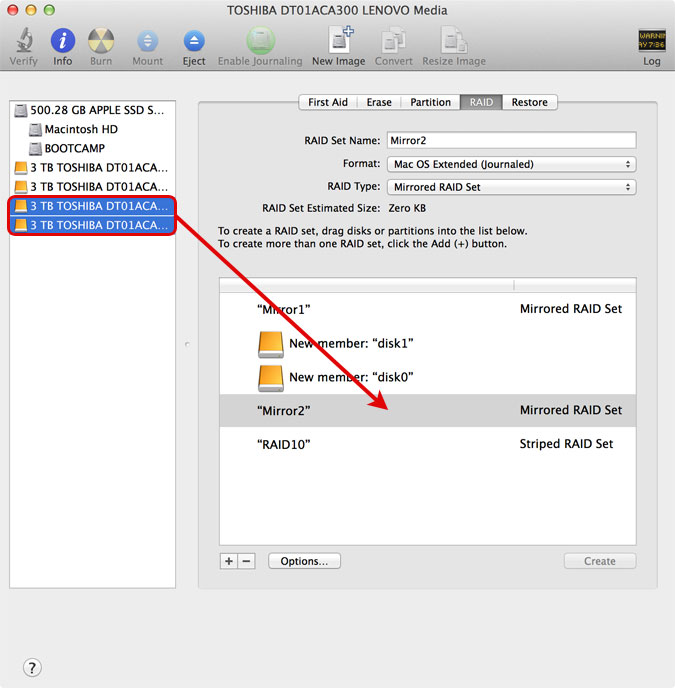
- Drag and drop the mirrored RAID sets to rearrange them and make sure that they are nested inside the striped RAID set. When done properly, each mirror will be indented from the striped set.
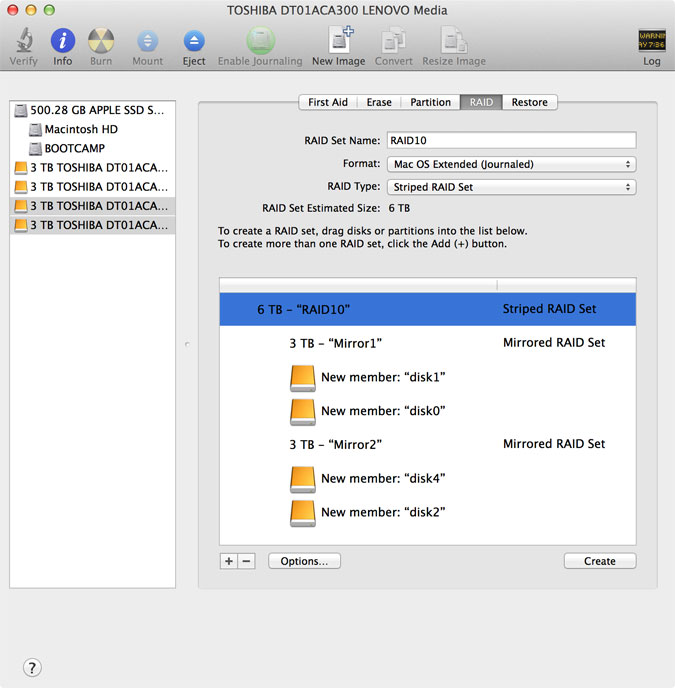
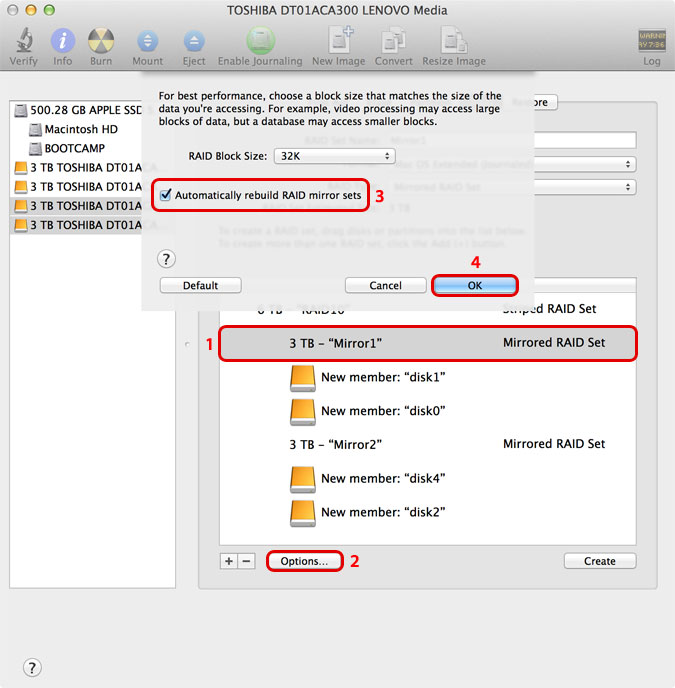
- Select the first mirror (1), click on Options... (2), enable the setting to Automatically rebuild RAID mirror sets (3) and click OK (4).
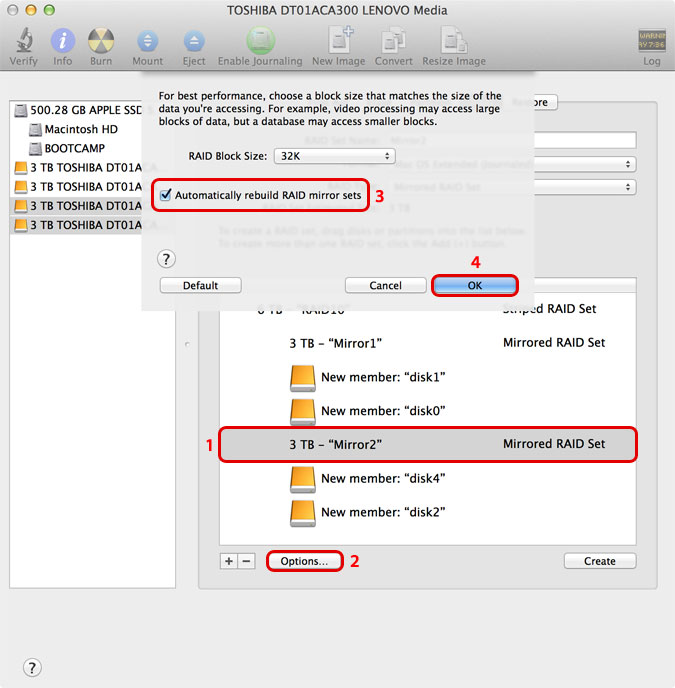
- Repeat the previous step with the second mirror.
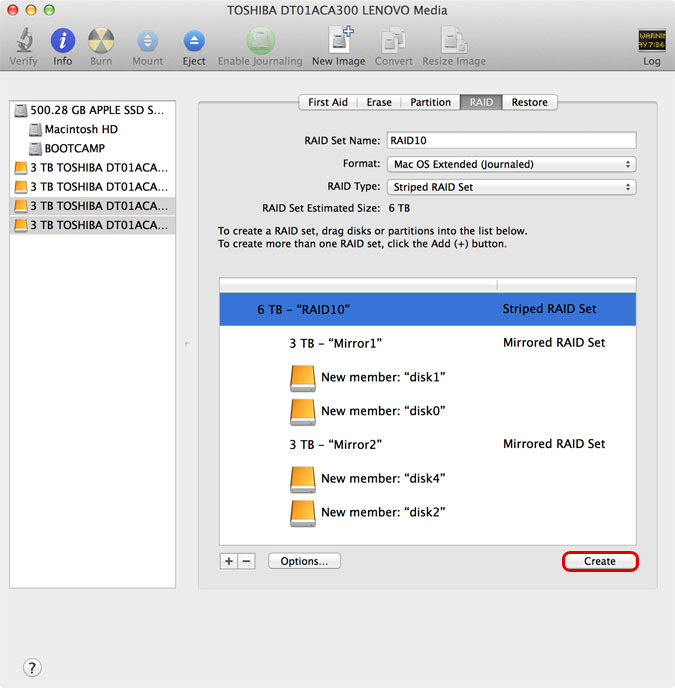
- Click Create to build your RAID 10 system.
- At this time, your new RAID set should also appear on your desktop.

- If a drive becomes disconnected, you can continue using the system. Once the drive becomes reconnected, the disk utility will automatically rebuild the disconnected drive. If a drive fails and must be replaced, you will have to manually rebuild the mirrored RAID set. To do so, select the degraded mirror from the list, drag and drop the new drive into the degraded mirror and click Rebuild to start the process. Please be aware that the rebuild process can take quite a long time.
Mac OS 10.11
How to create a software RAID on Mac OS X 10.11 (El Capitan)
Following instructions show how to create a RAID set [RAID 1] or [RAID 0] and how to [rebuild a degraded RAID] on Mac OS X 10.11 (El Capitan) using the Terminal.
With Mac OS X El Capitan, the disk utility can no longer be used to create and manage RAID sets. The only option is to use the Terminal and the diskutil command or purchase and install a 3rd party software like SoftRAID. RAID sets that were created on other systems can still be accessed.
To learn more about the diskutil command, open the Terminal and enter man diskutil to call up the manual. Scroll down to the appleRAID section for more details about managing a RAID set.
To prevent selecting the wrong disks and make it easier to identify the drives, we recommend to temporarily disconnect all other external drives and only connect the one which you would like to use for the RAID set.
How to create a mirrored RAID set (RAID 1) with two disks
- Start the Terminal. You can find this program under Applications > Utilities > Terminal.

- Enter diskutil list to display a list of the available disks.
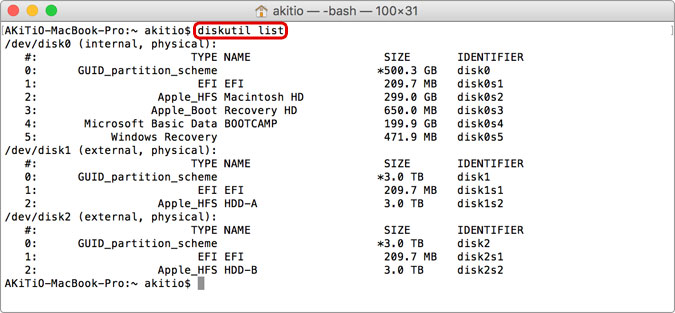
- Locate your external drive and write down the correct disk numbers. Make sure it's the correct disk, because all existing data will be erased in the next step!
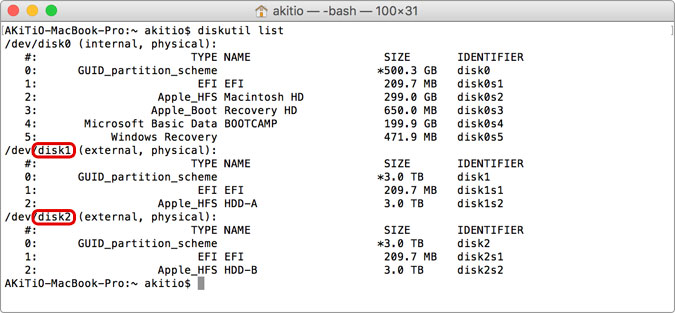
- In this example, we use the external disk1 and disk2. The options for the RAID mode are mirror, stripe and concat.
The command to create a RAID set is 'diskutil appleRAID create [RAID mode] [setName] [format] [devices]'. Here we are creating a mirrored RAID set named 'RAID1' with a HFS+ (Journaled) file system using disk1 and disk2. The command is diskutil appleRAID create mirror RAID1 JHFS+ disk1 disk2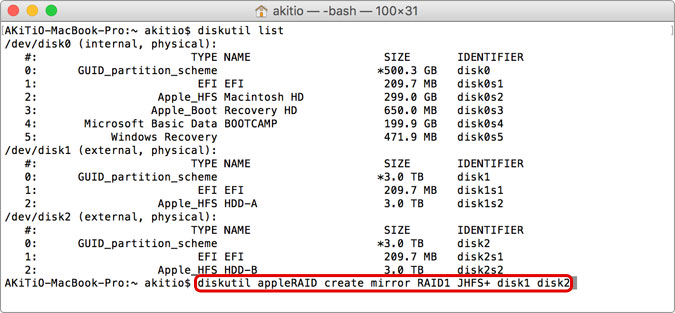
- Wait for the process to complete.
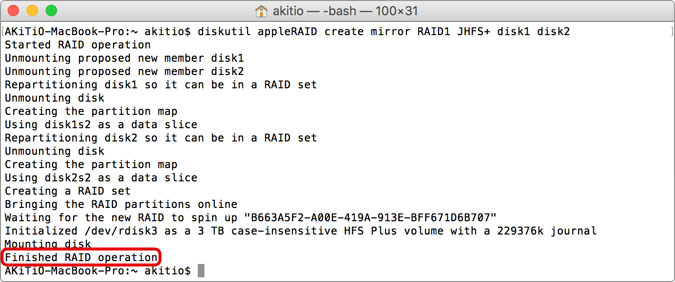
- Once the RAID set is ready, it will be mounted automatically on the desktop.

- The RAID set is also listed in the disk utility under the same name.
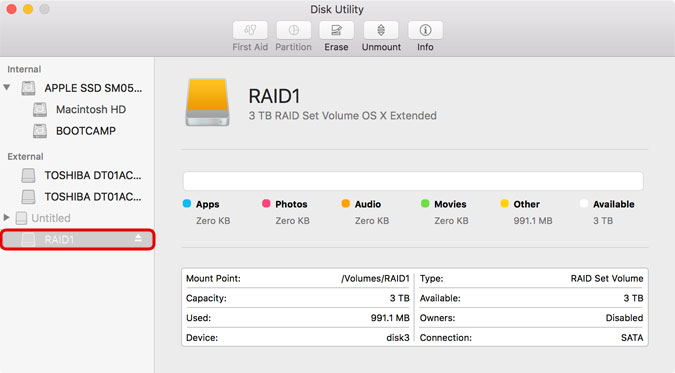
- To delete the RAID set, backup all data in a different location first and then check the mount point of your RAID set in the disk utility. In this example, the mount point is /Volumes/RAID1.
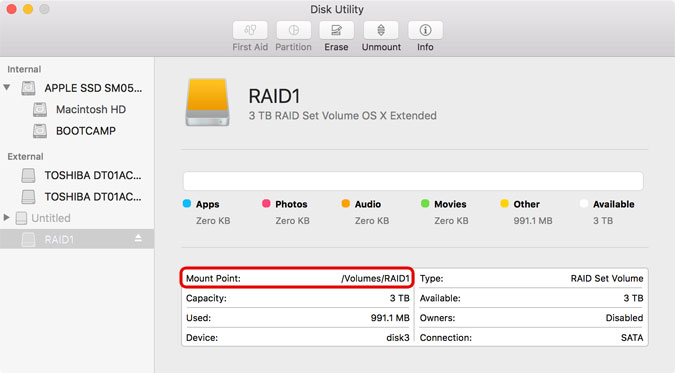
- Enter following command in the Terminal to destroy the RAID set but replace the path to the disk with the correct mount point as seen in the previous step. The command is diskutil destroyRAID /Volumes/RAID1

- Done. You can now use the disk utility to manage and format your disks.

How to rebuild a degraded RAID set
- Start the Terminal. You can find this program under Applications > Utilities > Terminal.

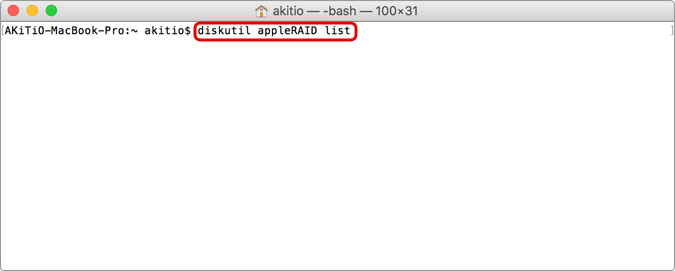
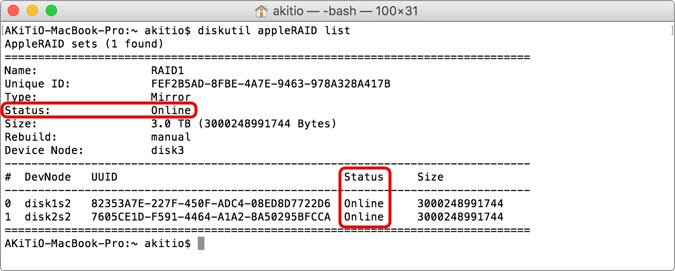
- Enter diskutil appleRAID list to display the details about your RAID set.
- Under normal circumstances, the status of the RAID set is Online and all disks are online as well.
- If there is a problem, the status of the RAID set changes to Degraded and the faulty disk is no longer online.
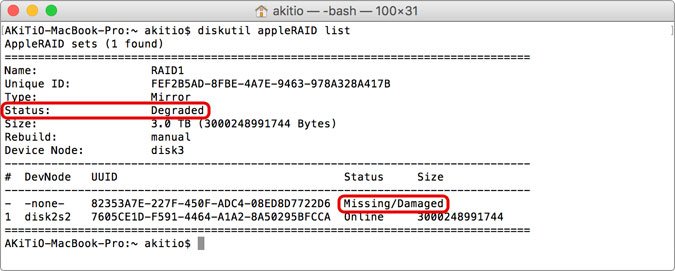
- Replace the faulty disk with a new one, making sure that the new disk is the same capacity or larger than the old one.
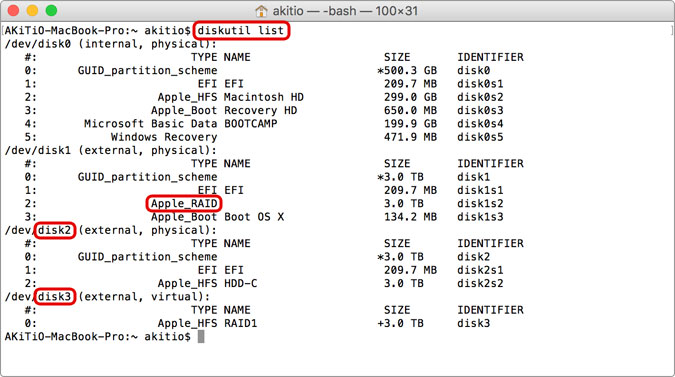
- Enter diskutil list to see the available disks. The disk that is part of the Apple RAID is the 'good' drive that is still online. In this example, disk2 is the new drive that is not yet part of the RAID set and disk3 is the RAID volume.
- To rebuild the RAID set, we need to add the new drive to the existing RAID set and then repair the mirror. The command is 'diskutil appleRAID repairMirror [raidVolume] [newDevice]'. In this example, we want to add the new disk2 to the existing disk3 RAID set, so the command is diskutil appleRAID repairMirror disk3 disk2
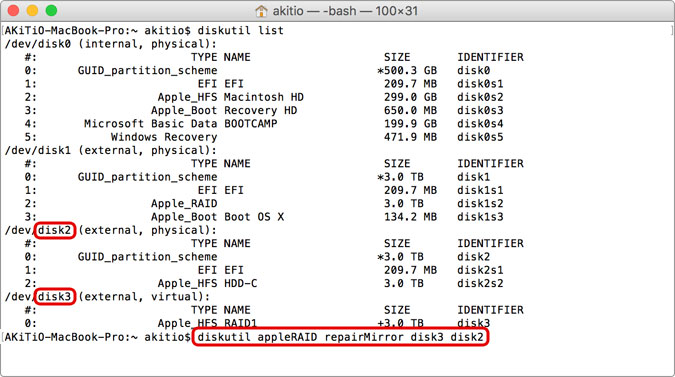
- Adding the new drive is done in a matter of seconds but rebuilding the mirror will take a while.

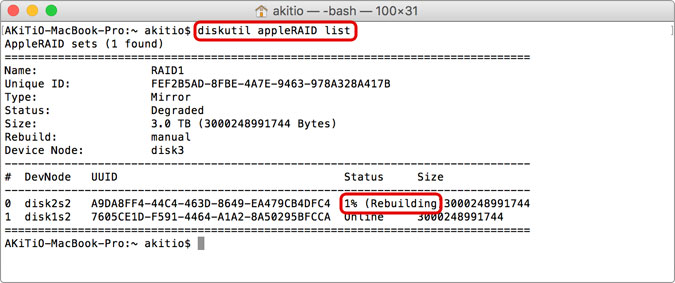
- To check the status, enter diskutil appleRAID list and it will show you how much of the mirror has already been rebuilt.
How to create a striped RAID set (RAID 0) with four disks
- Start the Terminal. You can find this program under Applications > Utilities > Terminal.

- Enter diskutil list to display a list of the available disks.
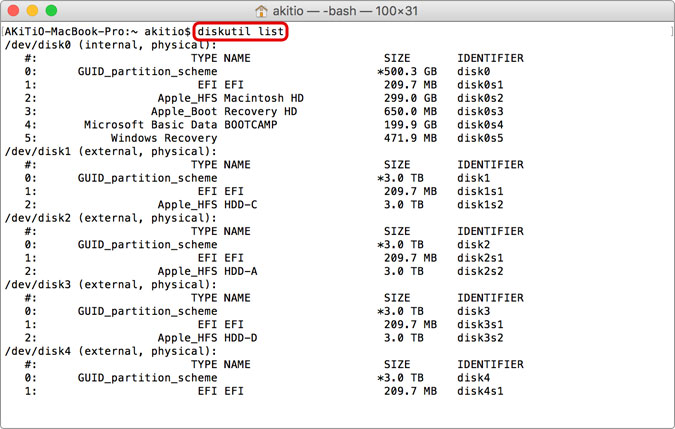
- Locate your external drive and write down the correct disk numbers. Make sure it's the correct disk, because all existing data will be erased in the next step!
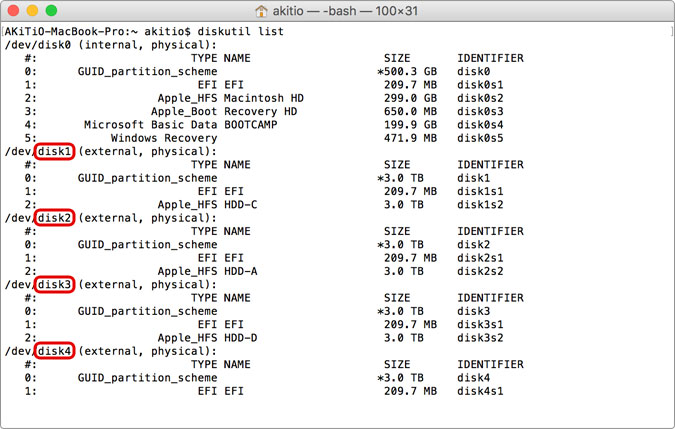
- In this example, we use the external disk1, disk2, disk3 and disk4. The options for the RAID mode are mirror, stripe and concat. The command to create a RAID set is 'diskutil appleRAID create [RAID mode] [setName] [format] [devices]'. Here we are creating a striped RAID set named 'RAID0' with a HFS+ (Journaled) file system using disk1, disk2, disk3 and disk4. The command is diskutil appleRAID create stripe RAID0 JHFS+ disk1 disk2 disk3 disk4
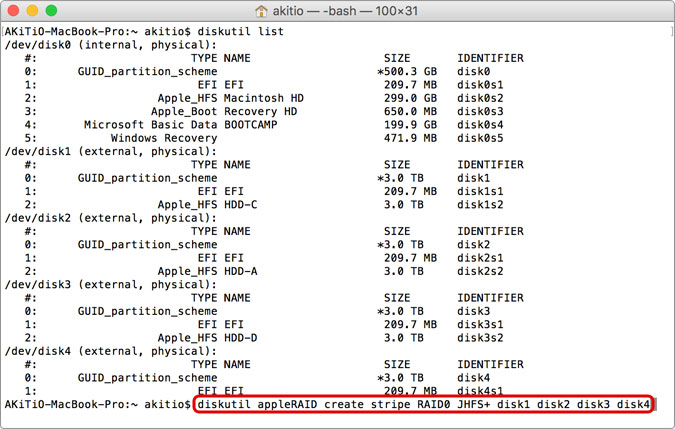
- Wait for the process to complete.
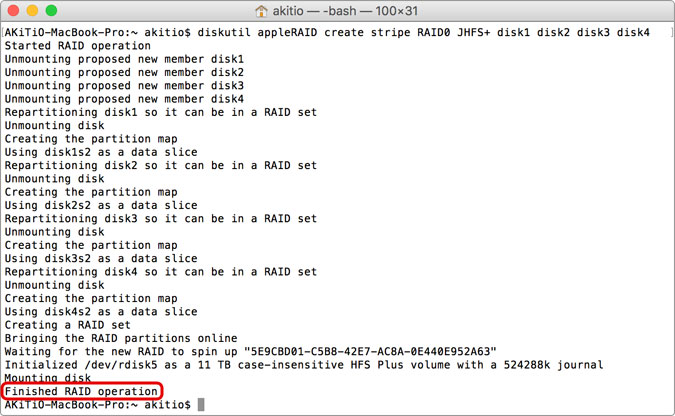
- Once the RAID set is ready, it will be mounted automatically on the desktop.

- The RAID set is also listed in the disk utility under the same name.
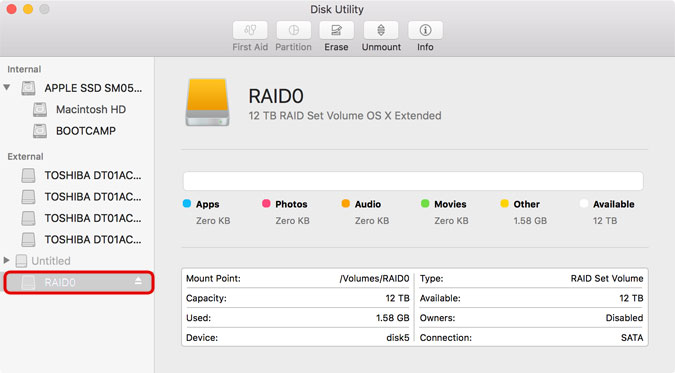
- To delete the RAID set, backup all data in a different location first and then check the mount point of your RAID set in the disk utility. In this example, the mount point is /Volumes/RAID0.
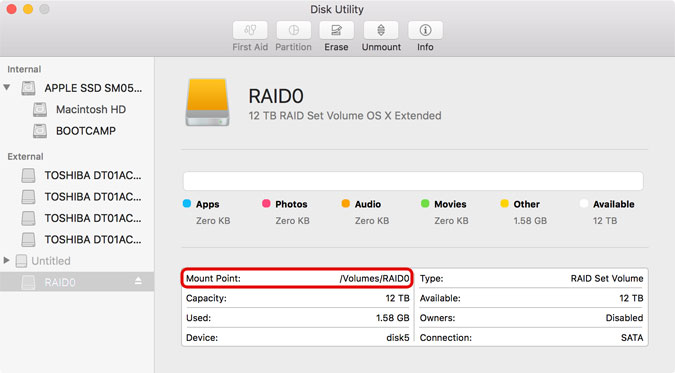
- Enter following command in the Terminal to destroy the RAID set but replace the path to the disk with the correct mount point as seen in the previous step.
diskutil destroyRAID /Volumes/RAID0
- Done. You can now use the disk utility to manage and format your disks.

macOS 10.12
How to create a software RAID on macOS 10.12 (Sierra)
Following instructions show how to create a striped RAID set (RAID 0) on macOS 10.12 (Sierra) using the RAID Assistant.
With macOS 10.12 Sierra, you can now create and manage a RAID set using the built-in RAID Assistant in the disk utility. RAID sets that were created on other systems can be both accessed and managed using the RAID Assistant.
To prevent selecting the wrong disks and make it easier to identify the drives, we recommend to temporarily disconnect all other external drives and only connect the one which you would like to use for the RAID set.
How to create a striped RAID set (RAID 0) with four disks
- Start the Disk Utility. You can find this program under Applications > Utilities > Disk Utility.

- To prevent selecting the wrong disks and make it easier to identify the drives, we recommend to temporarily disconnect all other external drives and only connect the ones that you would like to use for the RAID set.
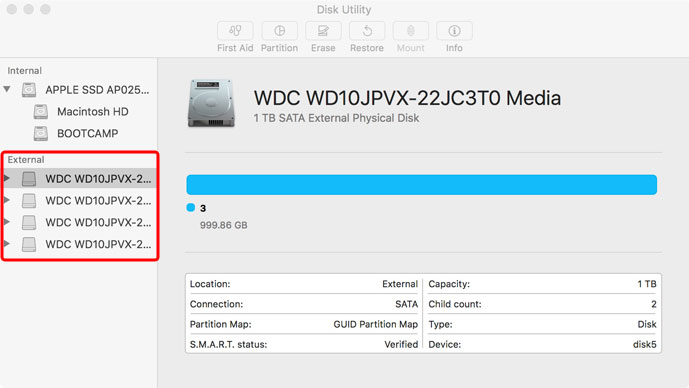
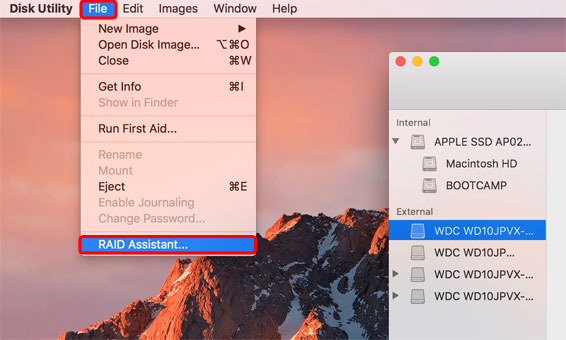
- Go to the File menu and open the RAID Assistant...
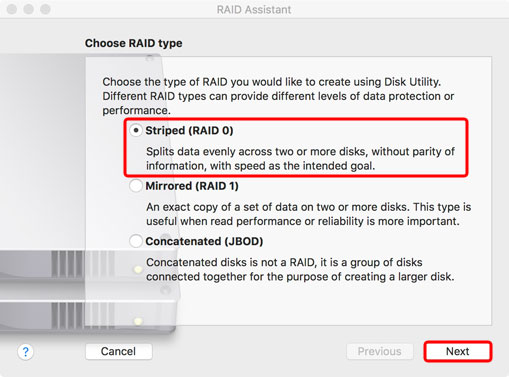
- Select your preferred RAID type and click Next.
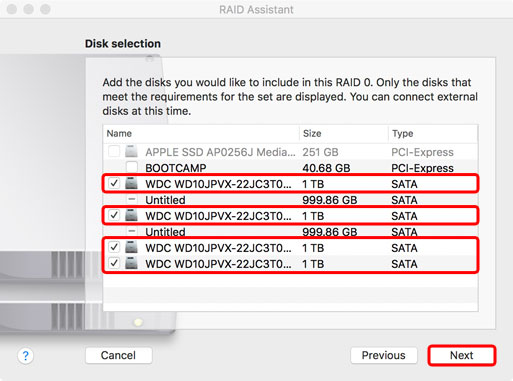
- Select all the disks that you would like to add to the new RAID set and click Next.
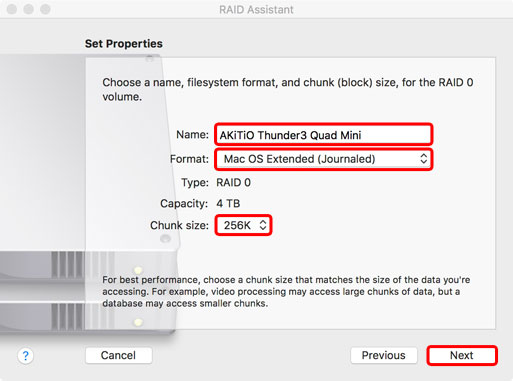
- Choose a name, filesystem format and chunk (block)size for the new RAID volume. Click Next when you are ready.
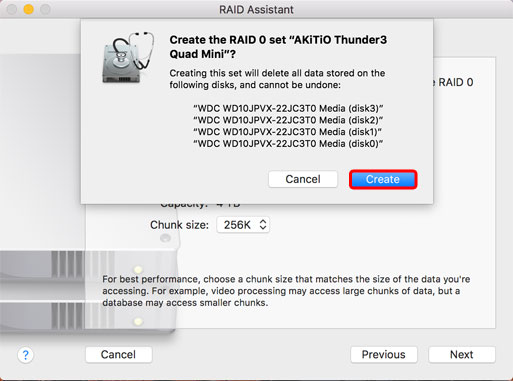
- Double-check and make sure that you have added the correct disks and then click Create.
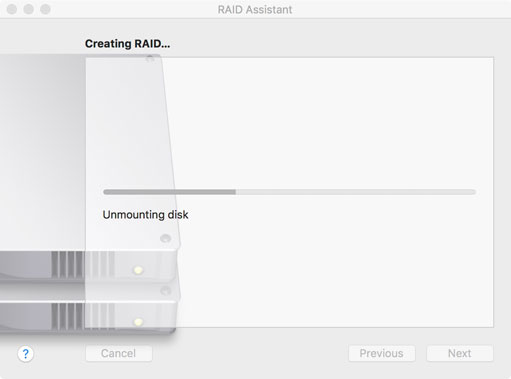
- Wait for the RAID Assistant to complete creating the new RAID volume.
- Click Done when the RAID set is ready.
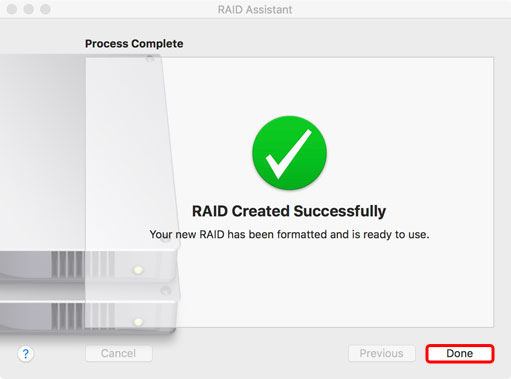
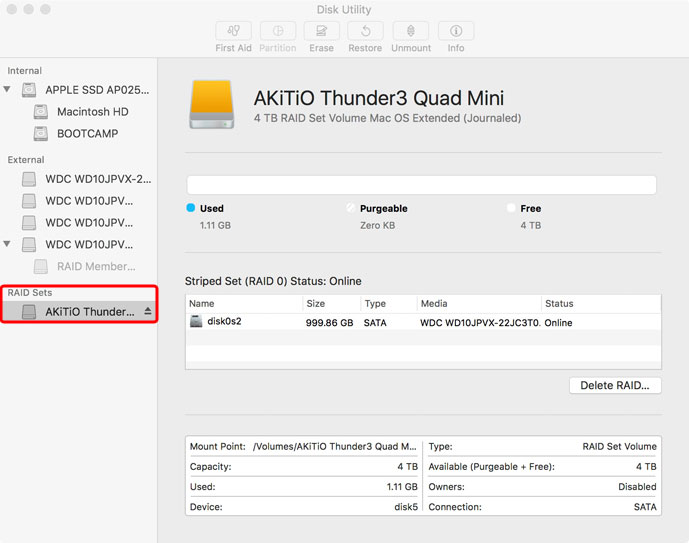
- In the disk utility, you can now see the new RAID set and it will also be mounted automatically on your desktop under the name that you have chosen at step 6.
RAID 5 on Mac OS X
How to create a RAID 5 system on Mac OS X
The disk utility on Mac OS X does not support RAID 5 but you can install 3rd party software and still create a RAID 5 system on your Mac. This article shows how to create a RAID 5 system using MacZFS but the same steps also apply to OpenZFS. As an alternative, you could also use paid software like SoftRAID, which uses a graphical user interface, provides faster transfer rates, comes with more features and includes technical support.
When creating a RAID 5 system as described in this article, hot plug is not supported! When disconnecting the drive, it is important to first unmount and then export the RAID system by using the commands seen in step 10. Otherwise, the system might crash and corrupt your data. If you simply turn off the computer, this step is not required. When you reconnect the device or restart your system, the drive will automatically mount again. This limitation does NOT apply to SoftRAID.
Resources:
- MacZFS (free)
- OpenZFS (open source)
- SoftRAID (not free but has GUI, is more user friendly, provides faster transfer rates and includes technical support)
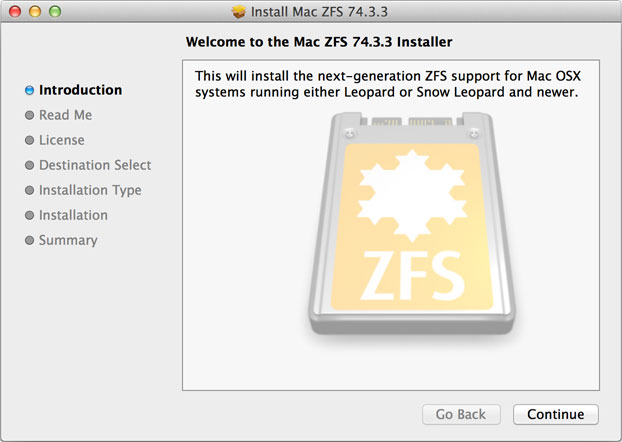
- Download and install MacZFS from https://code.google.com/p/maczfs/. In this example, we are using MacZFS 74.3.3. For more details about how to use MacZFS and manage your RAID system, please refer to the MacZFS Wiki.
- Connect your external storage device to your computer and turn on the power.
- Open the Terminal. You can find this program under Applications > Utilities > Terminal.

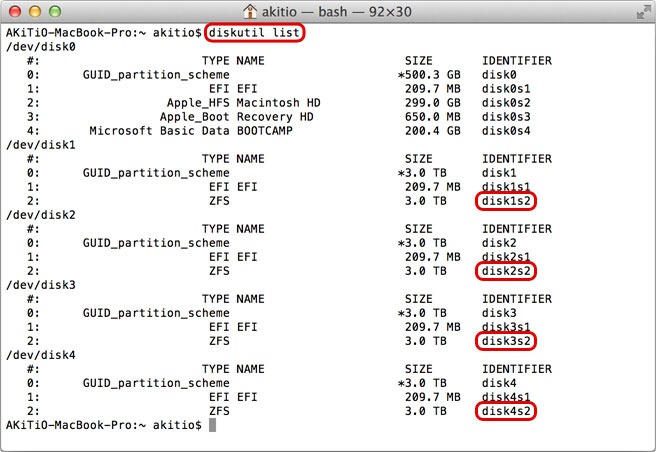
- Enter the command diskutil list in order to display all the available disks. In this example, disk0 respresents the internal drive and disks 1 to 4 are the external drives we will later add to the RAID 5 system. Please note that on your computer, the disk numbers might be different, so make sure to use the correct numbers.
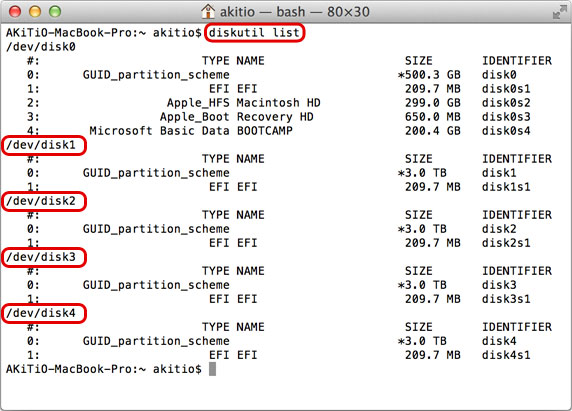
- Create a partition on all the drives that you would like to add to the RAID system. For a RAID 5 system, you will need at least 3 drives. Use the following command, one line at the time but change the disk number accordingly.
diskutil partitiondisk /dev/disk1 GPTformat ZFS %noformat% 100%
diskutil partitiondisk /dev/disk2 GPTformat ZFS %noformat% 100%
diskutil partitiondisk /dev/disk3 GPTformat ZFS %noformat% 100%
diskutil partitiondisk /dev/disk4 GPTformat ZFS %noformat% 100%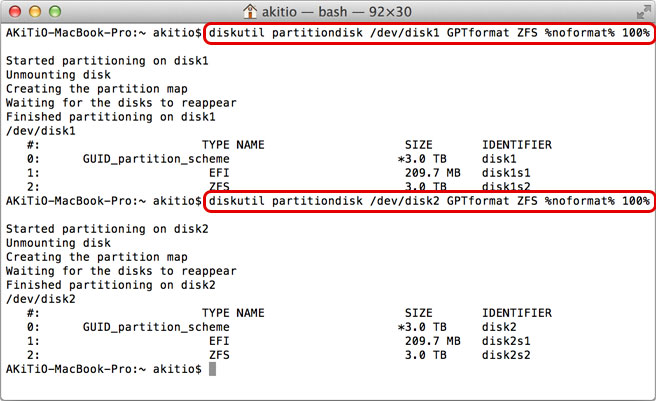
- Enter the command diskutil list again and you should see that each drive now has 3 partitions. Note the identifier for the ZFS partitions for the next step. In this example, we will use disk1s2, disk2s2, disk3s2 and disk4s2.
- Create a RAID 5 system (zpool) with the ZFS partitions from the previous step but make sure to use the correct disk numbers as seen on your own system. Enter following command but feel free to change the "raidname" to any name you like. This will be the name of your new RAID system. When prompted, enter the password of your system administrator account to execute the command.
sudo zpool create raidname raidz disk1s2 disk2s2 disk3s2 disk4s2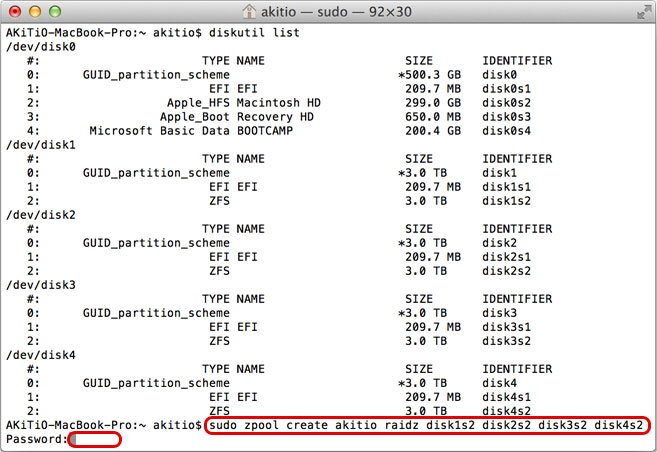
- To check if the RAID system has been created successfully, enter following command
zpool status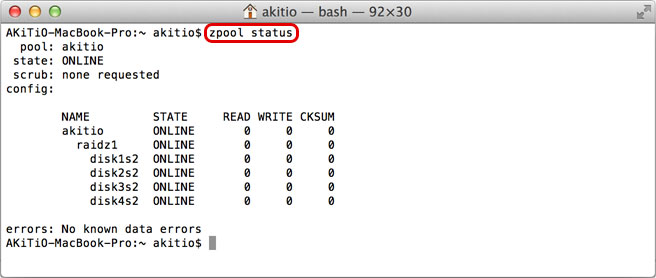
- At this time, your RAID system should also appear on your desktop.

- Because hot plug is not supported, if you would like to eject the drive and then later reconnect it, it is important to first unmount and export the RAID system. Otherwise, the system might crash and corrupt your data. If you simply turn off the computer, this step is not required. When you connect the device again or restart your system, the RAID system will automatically mount again. The following two commands will unmount and export the RAID system.
diskutil unmount /Volumes/raidname
sudo zpool export raidname
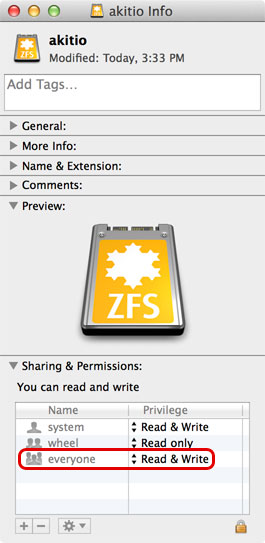
- The files are owned by the user who ran the ZFS setup command. In order for everyone else to access and use this drive, please use Get Info (command + I) in the Finder to change the permissions for everyone to Read & Write.
Disclaimer:
Information in this article is subject to change without notice. AKiTiO does not make any representations or warranties (implied or otherwise) regarding the accuracy and completeness of this document and shall in no event be liable for any loss of profit or any other commercial damage, including but not limited to special, incidental, consequential, or other damages. All brand names and product names used in this document are trademarks, or registered trademarks of their respective holders.

