Formatting a hard disk drive (HDD) in an external hard drive enclosure is done the same way like an internal drive. Simply connect the external drive via Thunderbolt, USB, FireWire or eSATA to your computer, turn on the power and then use the native disk utility of the Operating System or a 3rd party program. In case your hard drive enclosure has a built-in RAID controller, make sure to set your preferred RAID mode before you format the hard drives.
Warning:
Removing partitions and formatting a hard drive will destroy all existing data on that particular disk! Make sure you have a backup of all your data in a different location prior to making any changes to the external drive.
Win 98SE/ME
Format a drive on Windows 98SE & Windows ME
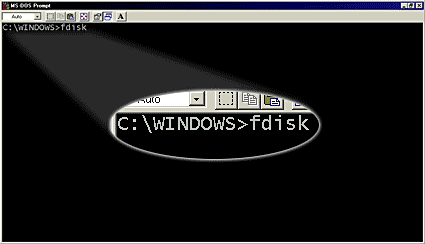
The tool used to format or reformat the drive on Windows 98 is the so called DOS command prompt and "fdisk". You can start it by going to Start/Program Files/Accessories and selecting "MS-DOS" or you can go to Run and type "fdisk" instead.
- The first window will be the blank MS-DOS command prompt. Type fdisk and press Enter. Skip this step if you came via Run.
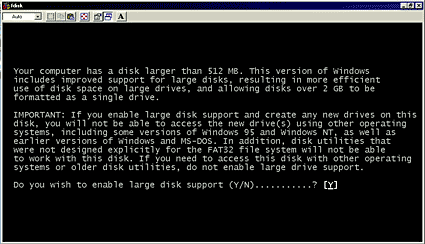
- Select Y to enable the large disk support and press Enter.
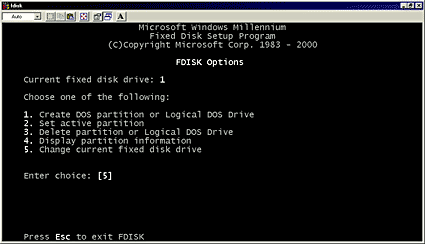
- Enter 5 to change the current disk drive and press Enter.
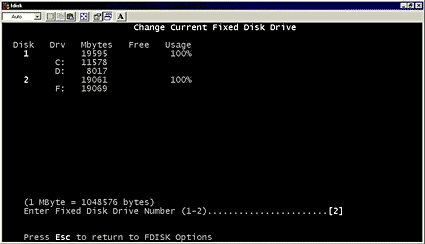
- Select the drive you want to format but make sure to select the correct one. In this example it is disk 2 but that may be different in your case!
- Enter 1 to create a primary DOS partition and follow the on-screen instructions. After you have created the partition according to your requirement, close the MS-DOS command prompt by typing exit.
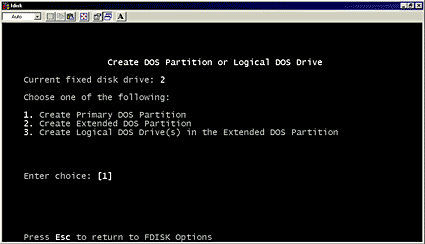
- Restart your computer and then go to My Computer. The new drive should now appear and after double-clicking on the drive icon, you will be prompted to format it. Choose FAT32 and full format, enter a name for it and format the drive. Your external hard drive is now ready to use! Note: The FAT32 file system can be used on most Operating Systems including Win98SE, WinME, Win2000, WinXP, Windows Vista, Windows 7, Mac OS 9, Mac OS X and Linux Systems but the maximum size of a single file is limited to 4GB.
Win XP
Format a drive on Windows XP & Vista
The tool used to format or reformat the hard drive on Windows XP and Vista is the so called Disk Management application. You can find it by right-clicking on My Computer, choosing Manage and then selecting Disk Management. The alternative is to go to Start/Control Panel/Administrative Tools/Computer Management.
- Right-click on My Computer and select Manage.
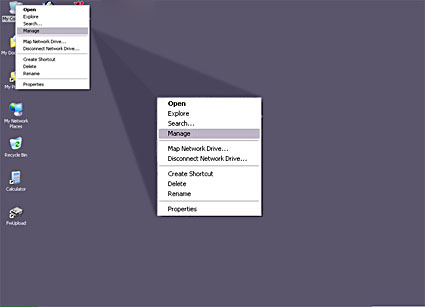
- Go to Disk Management.
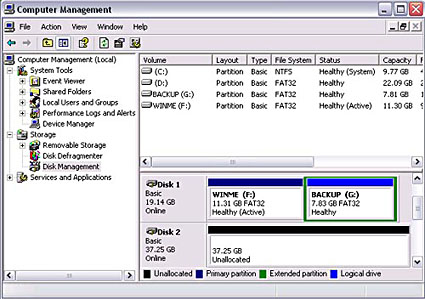
- Choose the drive you want to prepare and right-click on the gray field on the left side in order to initialize the drive. Once done, right-click on the Unallocated space for further commands and select New Partition.
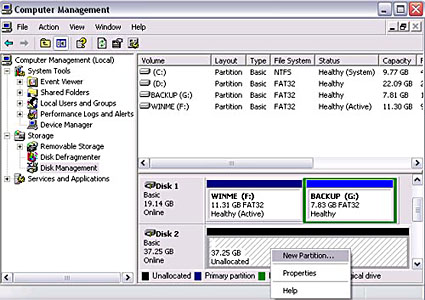
- Follow the Partition Wizard and set up the drive according to your requirements. In general, we recommend to create one primary partition and format the hard drive using the NTFS file system.
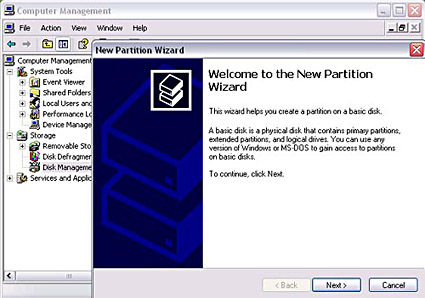
- Go to My Computer and the new drive should now appear. If the drive has not been formatted already, you will now be prompted to format it. Select NTFS if the drive is only used on Windows XP, Windows Vista or Windows 7. If the drive will be used on older or different Operating Systems, you may want to select FAT32 instead. Keep in mind that on Windows XP, Windows Vista and Windows 7, the largest partition that can be created using FAT32 is 32GB and the size of a single file can not exceed 4GB.
Win 7
Create a partition and format a drive on Windows 7
The tool used to format or reformat a hard drive on Windows 7 is the Disk Management application. One way to access it is by right-clicking on My Computer, choosing Manage and then selecting Disk Management. Another way is with the Run command as described below.
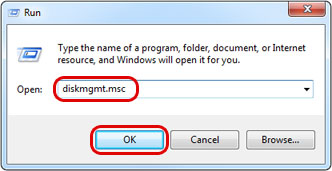
- Go to Start, select Run, type diskmgmt.msc and click OK to start the disk management application.
- If it is a brand new drive without any existing partitions, the disk management application will automatically prompt you to initialize the disk. If not, right-click on the external disk (e.g. Disk 3) and select Initialize Disk.
For volumes up to 2TB, the MBR partition provides the best compatibility. For volumes over 2TB, select the GPT partition in order to make use of the full storage capacity. Click OK to create the partition.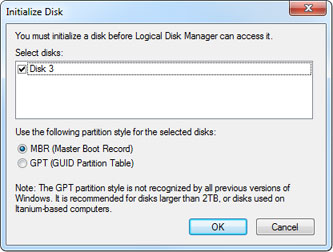
- Right-click anywhere in the "Unallocated" space of the new disk and select New Simple Volume...
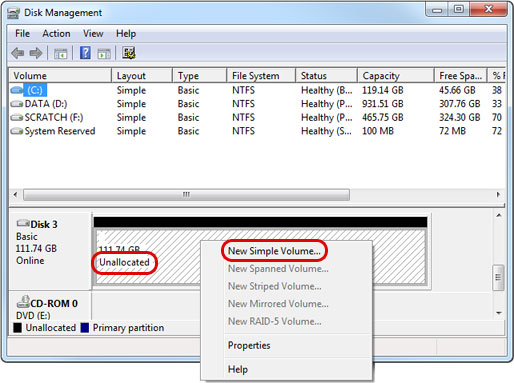
-
Follow the Partition Wizard to create a new primary partition and format the drive. For Windows, we recommend using the NTFS file system.
Create a large partition over 2TB on Windows 7
If it is a brand new drive without any existing partitions, see the instructions above but make sure to select the GPT partition at step 2.
If a partition has previously been created on a system that does not support large volumes over 2TB, you will need to use the command line interface to clear any previous partitions and then use the Disk Management application to create a new GUID Partition Table.
- Go to Start, select Run, type diskpart and click OK.
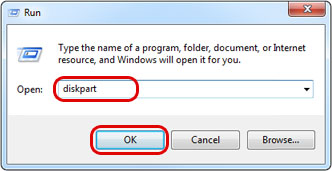
- Type list disk to see all the available disks. For more information about the disk part program, see http://support.microsoft.com/kb/300415.
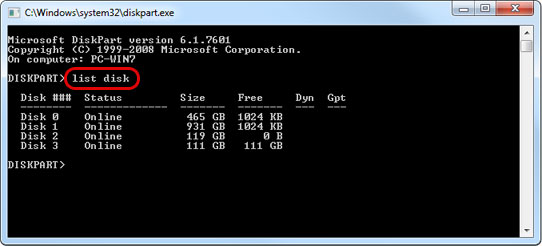
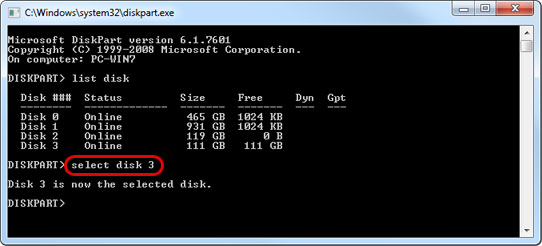
- Select the external disk. As an example, to select Disk 3, type select disk 3.
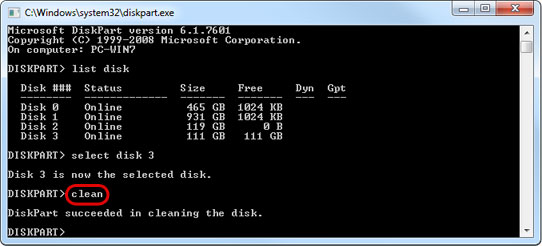
- Type clean to clear the existing partition(s). MAKE SURE THE CORRECT DISK HAS BEEN SELECTED BEFORE YOU EXECUTE THE COMMAND!
- Go to Start, select Run, type diskmgmt.msc and click OK to start the disk management application.

- The disk management application will automatically prompt you to initialize the disk. Select GPT (GUID Partition Table) and click OK to create the partition.
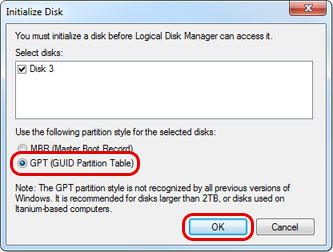
- Right-click anywhere in the "Unallocated" space of the new disk and select New Simple Volume...

-
Follow the Partition Wizard to create a new primary partition and format the drive using the NTFS file system.
Win 8/10
Create a partition and format a drive on Windows 10
The tool used to format a drive on Windows 8 and Windows 10 is the Disk Management application. One way to access it is by right-clicking on 'This PC', choosing Manage and then selecting Disk Management. Another way is with the Run command as described below.
- If this is a brand new drive that has never been formatted before, skip to step 9. Otherwise, continue with step 2 to delete all existing partitions and files on the drive first.
- Press the Windows and the R key on your keyboard to bring up the Run command.

- Type diskpart and click OK. For more information about the disk part program, see http://support.microsoft.com/kb/300415.
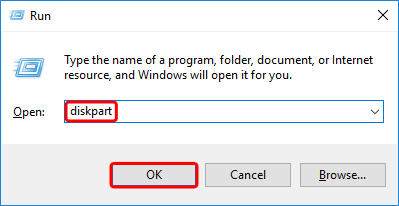
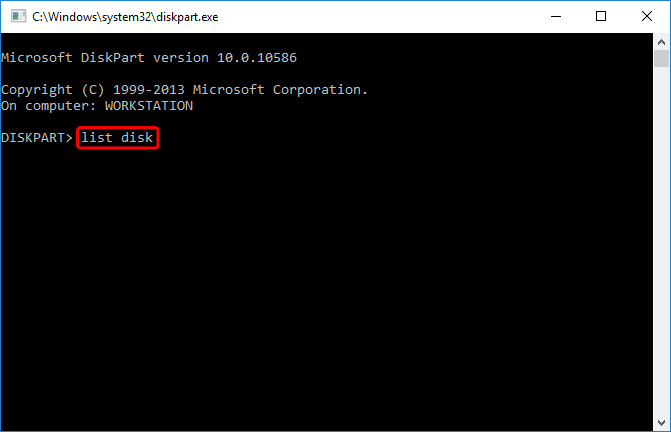
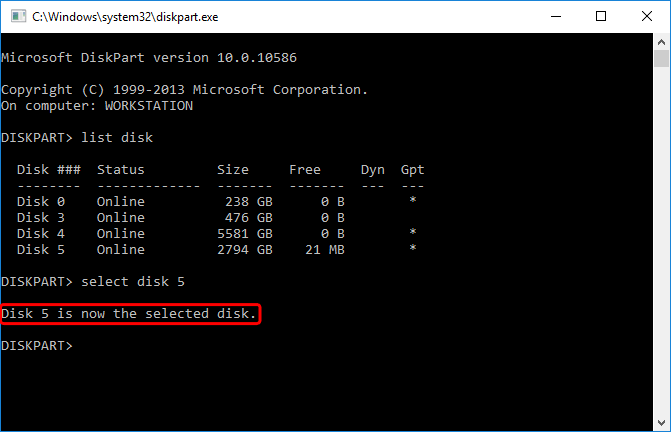
- Type list disk to see all the available disks.
- Select the external disk. Usually, if you have only just connected the external drive, it's the last disk in the list but if you are unsure, use the disk management application as seen in step 12 to double check. In this example, it's Disk 5, so to select it type select disk 5.
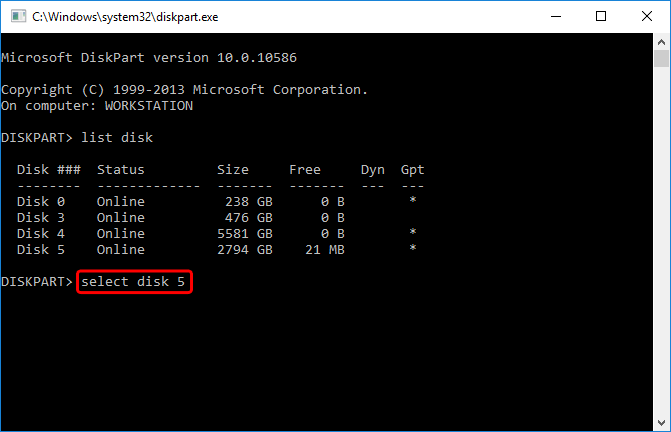
- MAKE SURE THAT THE CORRECT DISK HAS BEEN SELECTED BEFORE YOU CONTINUE!
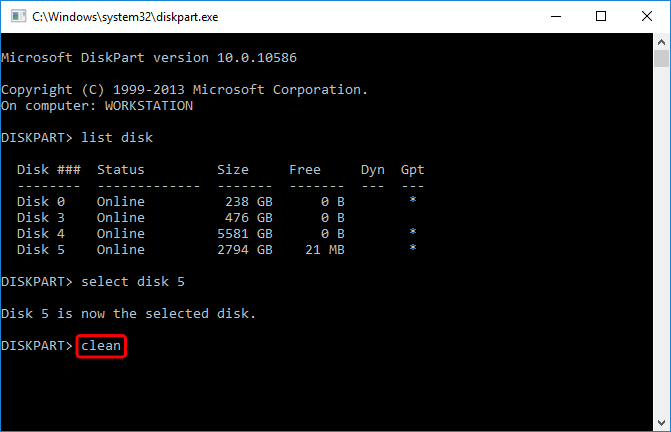
- Type clean to clear the existing partition(s).
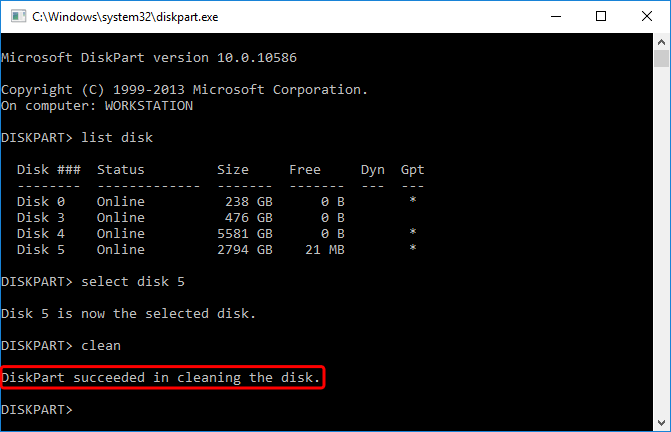
- All existing partitions have now been removed and the disk is ready to be formatted.
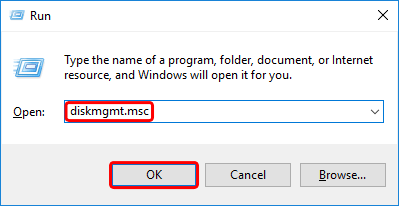
- Press the Windows and the R key on your keyboard to bring up the Run command.

- Type diskmgmt.msc and click OK to start the disk management application.
- For drives without existing partitions, the disk management application will automatically prompt you to initialize the disk.
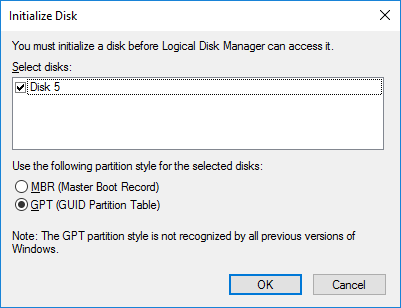
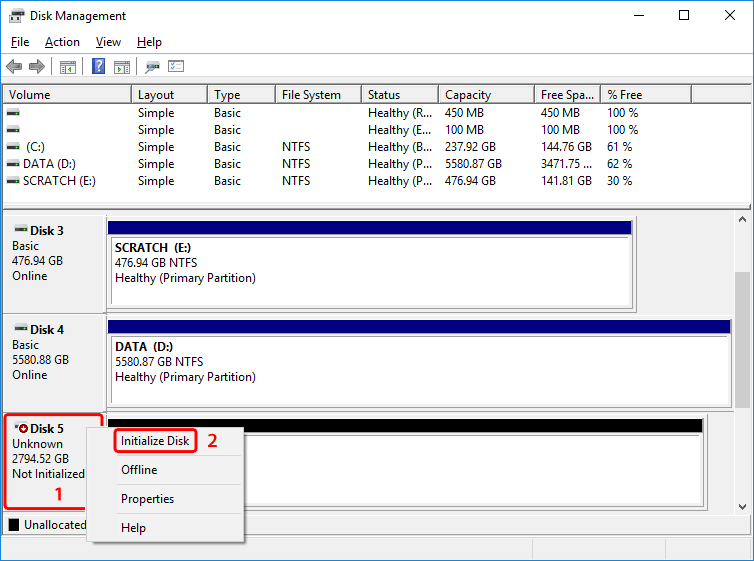
- If you don't get prompted to initialize the disk, right-click on the external disk (e.g. Disk 5) and select Initialize Disk. For disks that have already been initialized, skip to step 14.
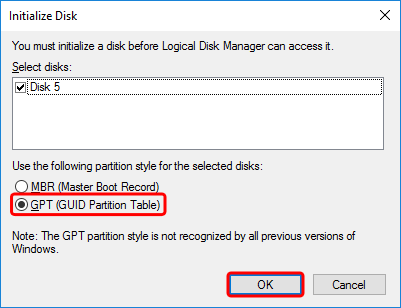
- For use with Windows 8 and Windows 10, select the GPT partition but keep in mind that this drive won't be compatible with older systems like Windows XP. Click OK to create the partition.
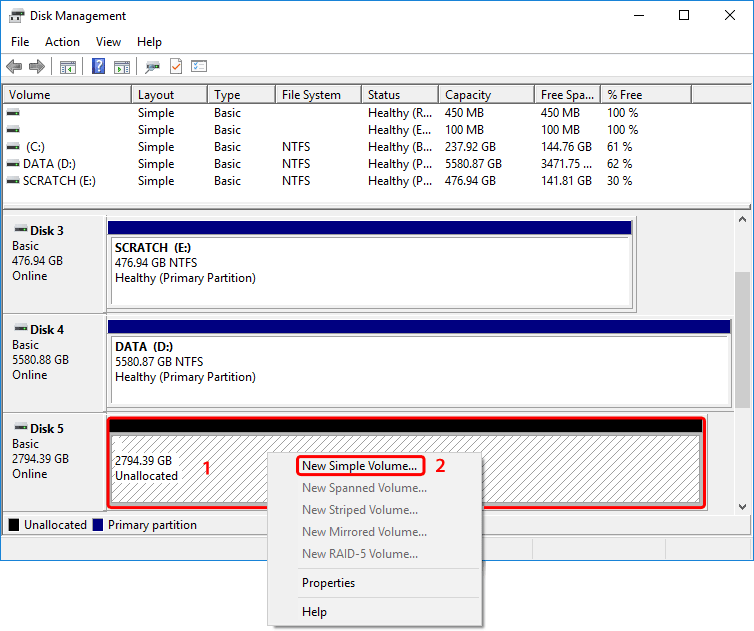
- Right-click anywhere in the 'Unallocated' space of the new disk and select New Simple Volume...
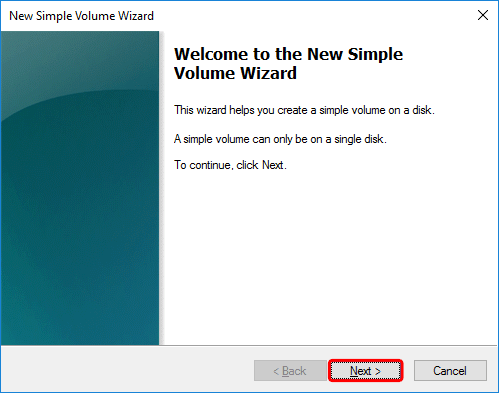
- Follow the Partition Wizard to create a new partition and format the drive. Click Next to continue.
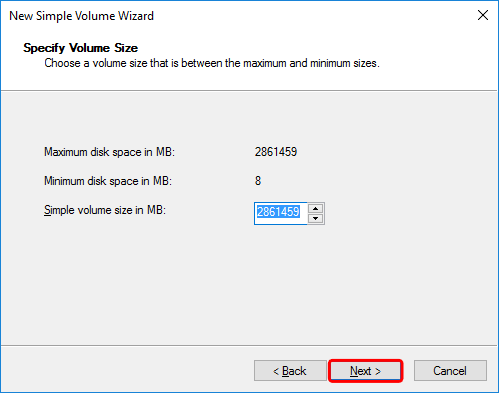
- Use the default value to create a single partition with the maximum storage capacity. Click Next to continue.
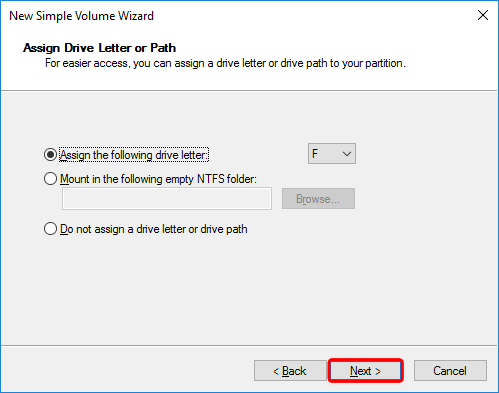
- Use the default value to automatically assign a drive letter. Click Next to continue.
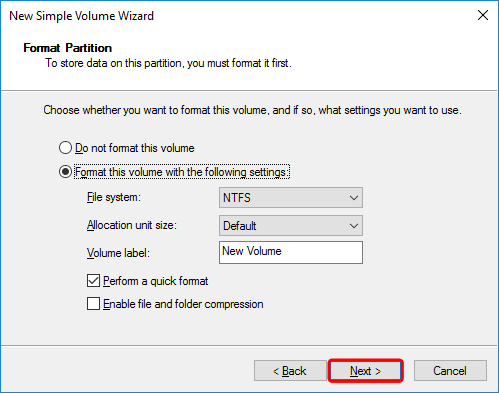
- For Windows, format the drive using the NTFS file system. Click Next to continue.
- Double check all your settings and then click Finish to format the drive.
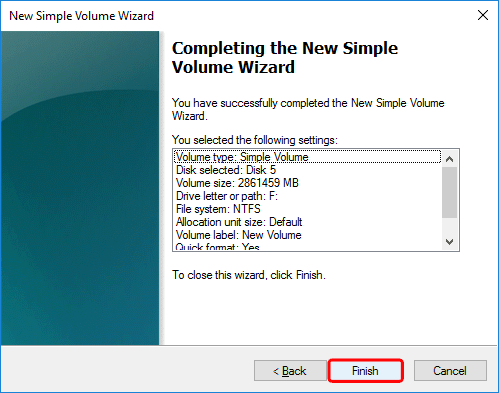
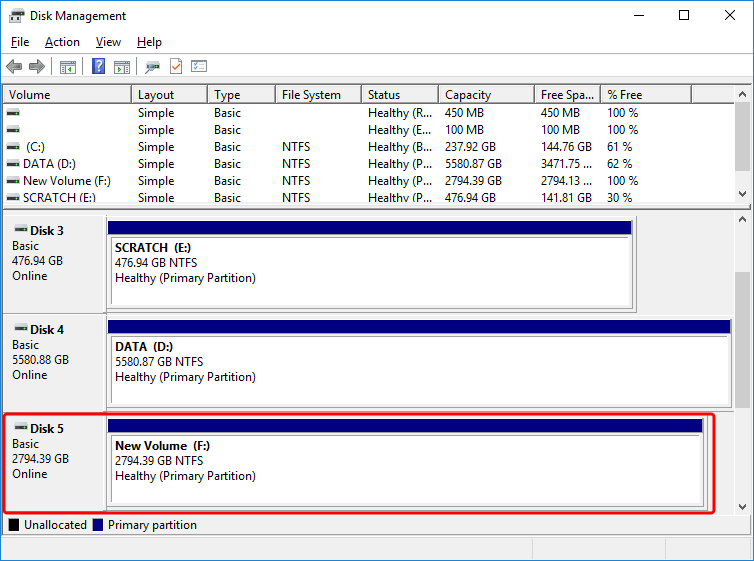
- Your drive is now ready.
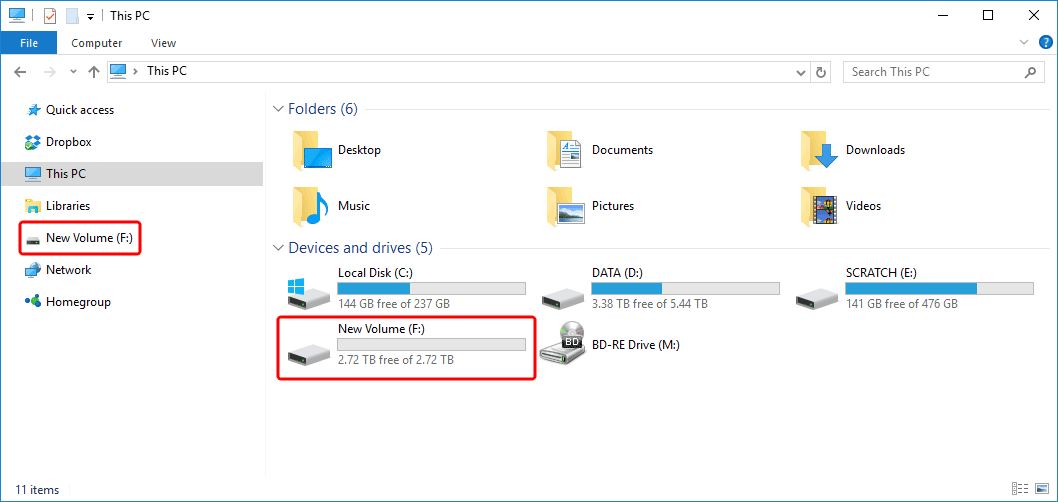
- You can access the new drive like any other internal drive using the file explorer.
Mac OS X
Format a drive on Mac OS X
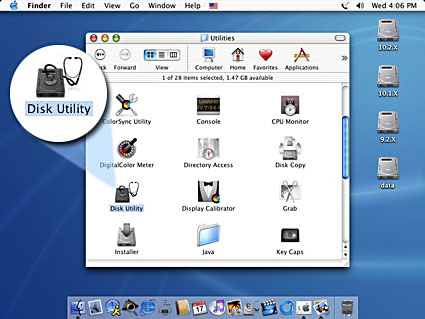
The tool used to format a drive on Mac OS X is the Disk Utility. You can find this program inside the Utilities folder.
- Locate the Disk Utility in the Utilities folder and launch it.
- Select the external drive, go to Partition, select 1 Partition from the drop-down list, name your new drive and select your preferrred format. For Mac OS X, we recommend using Mac OS Extended. Click Partition to create the partition and format the drive.
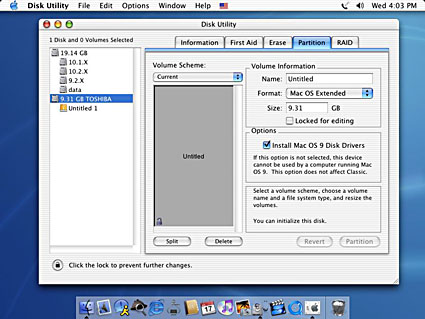
- Your drive is now ready on your desktop.

Mac OS 10.2-10.10
Format a drive on Mac OS X 10.2 to 10.10
The tool used to format a drive on Mac OS X is the Disk Utility. You can find this program inside the Utilities folder.
- Locate the Disk Utility in the Utilities folder and launch it.
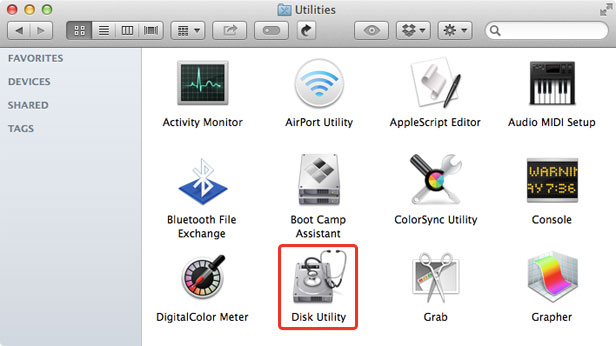
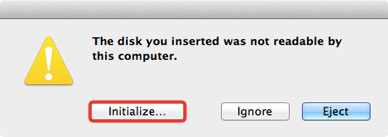
- If this is a brand new drive or the system does not recognize the existing file system, you will be presented with three choices. In this case, we are going to format it, so select Initialize... to continue.
- Select the external drive (1), go to Partition (2), select 1 Partition from the drop-down list (3), click Options... to set the partition theme to GUID Partition Table (4), name your new drive (5) and select your preferrred format (6). For Mac OS X, we recommend using Mac OS Extended. Click Apply (7) to continue.
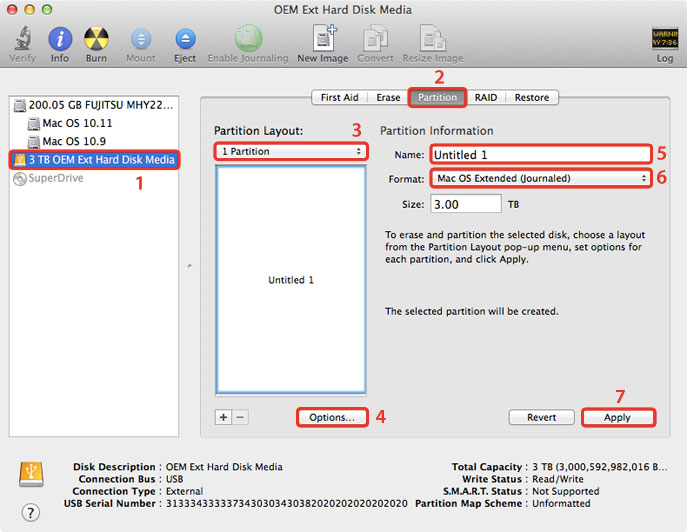
- Click Partition to create the partition and format the drive.
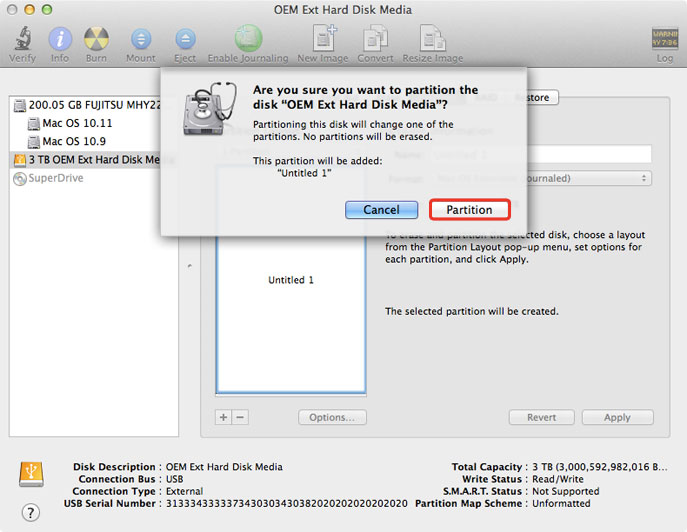
- Your drive is now ready on your desktop.

macOS 10.11-10.13
Format a drive on macOS 10.11 to 10.13
The tool used to format a drive on macOS is the Disk Utility. You can find this program inside the Utilities folder.
- Locate the Disk Utility in the Utilities folder and launch it.
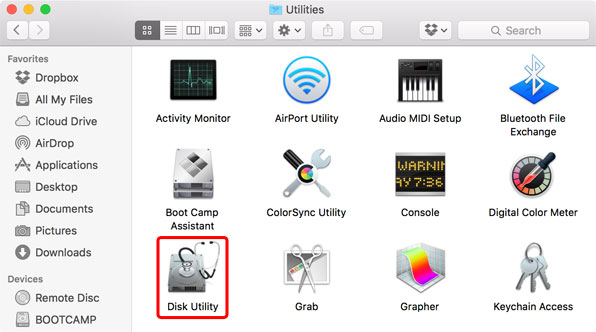
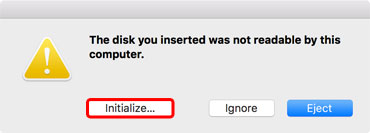
- If this is a brand new drive or the system does not recognize the existing file system, you will be presented with three choices. In this case, we are going to format it, so select Initialize... to continue.
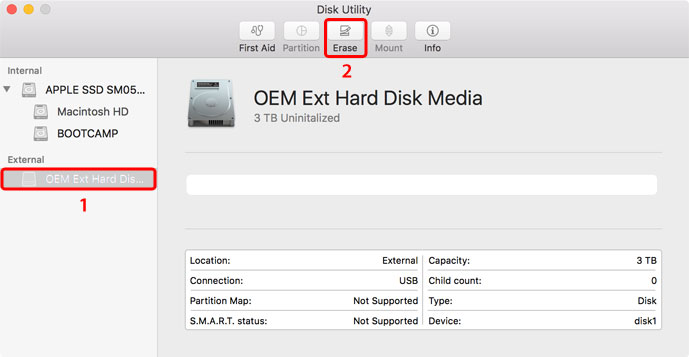
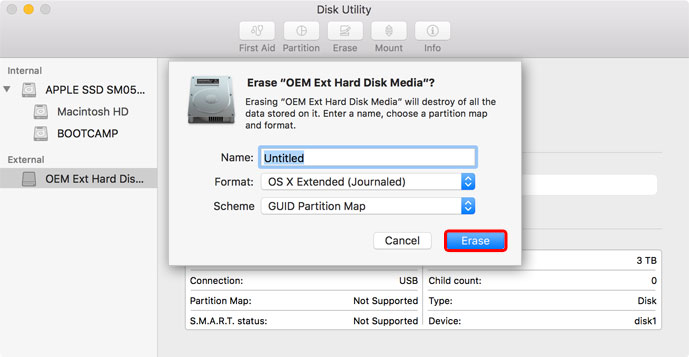
- Select the external drive and then click Erase.
- Name your new drive and select your preferred format. For macOS, we recommend using Mac OS Extended. If you are using an SSD on macOS 10.13, you could also use APFS (Apple File System). Click Erase to format the drive.
- Wait for the formatting process to finish and then click Done.
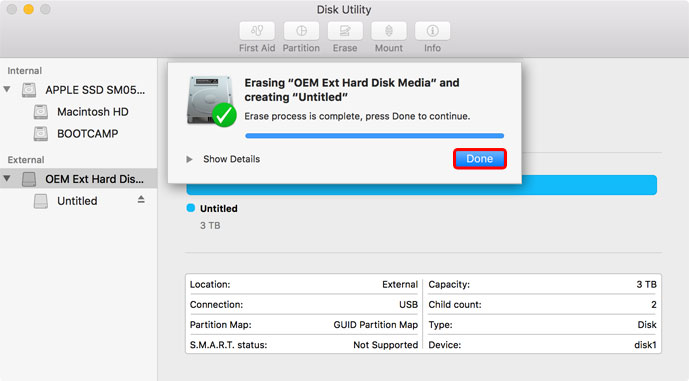
- Your drive is now ready on your desktop.

Disk not found in disk utility when using macOS 10.13 (High Sierra)
If your external drive is not recognized in the disk utility or you are unable to erase the disk, you can use the Terminal and the diskutil command to erase the disk first. Once the disk has been erased, you should be able to use the disk utiliy as described above to setup your drive.
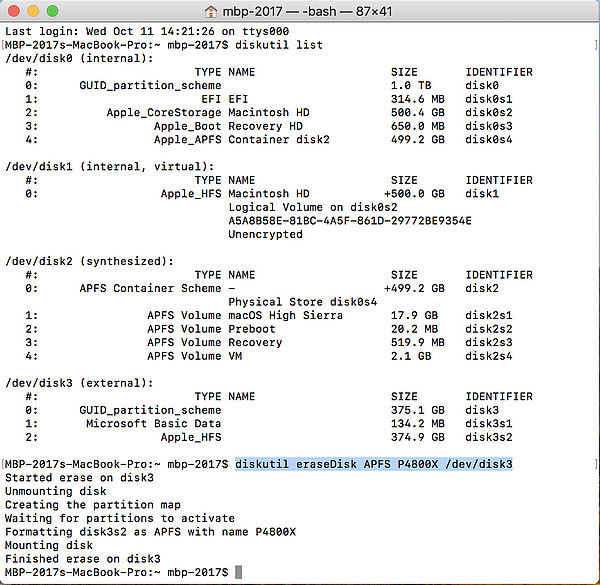
- Go to Applications > Utilities and open the Terminal.
- Use the command diskutil list to display all the disks and find out the path of the disk you would like to format.
- In this example, there is only one external disk and the correct path is /dev/disk3.
- To erase the disk using the APFS file system, use the following command:
diskutil eraseDisk APFS P4800X /dev/disk3 - At this point, your disk should show up in the disk utility and if needed, you can now manage it there.
Following is an explanation of the commands used in this example:
- diskutil eraseDisk > Erases the selected disk
- APFS > The file system used to format the disk
- P4800X > The name of the new disk (choose your own name)
- /dev/disk3 > The current path to the disk (make sure to select the correct disk)
FAQ
Frequently Asked Questions
How come I cannot format the external hard drive on Mac OS 10.5?
Some users seem to be able to format the drive on Windows just fine but are unable to format the same drive on Mac OS 10.5. If that happens, go to Options, select the Apple Partition Map and then try formatting it again.
How to partition a hard drive without formatting?
On Windows, this is only possible with 3rd party applications. When using the native disk management utility to modify the partition, it will erase all existing data and requires you to re-format the drive.
I cleared the partition but didn't format the drive yet. Can I still recover the data?
In general, when you remove the partition, the data is no longer accessible. However, if you didn't do anything else yet, like formatting, it might be possible to recover some or all of the data with 3rd party data recovery software. To recover the lost partition, we suggest trying the open source program TestDisk.
What file system should I choose to format my external hard drive?
This will depend on how you want to use the drive but in general, we recommend following formats:
- NTFS for Windows XP, Windows Vista, Windows 7, Windows 9, Windows 10
- HFS+ (Mac OS Extended) for Mac OS X
- FAT32 or exFAT to use across different platforms like Windows, Mac and Linux (single file size for FAT32 is limited to 4GB)
Disclaimer:
Information in this article is subject to change without notice. AKiTiO does not make any representations or warranties (implied or otherwise) regarding the accuracy and completeness of this document and shall in no event be liable for any loss of profit or any other commercial damage, including but not limited to special, incidental, consequential, or other damages. All brand names and product names used in this document are trademarks, or registered trademarks of their respective holders.

